Importing Cleared Checks into Accounts Payable
Version
Contents
Overview
The cleared
checks import clears checks automatically on import to Accounts Payable. When
you run the cleared checks import, you upload a file of check information to
Accounts Payable. The import file is in a comma-separated (.csv) format. The file contains
a header, and for each check, a row of details. The system processes each successfully
uploaded file to generate the individual check lines. The
import process creates a record for each line, except for the first line. You
can import checks, or you can
run an import job manually.
In order
to import cleared checks, you must have your banks and bank accounts set up
in the application. If critical information is missing or incorrect, import errors
can occur, as described below.
When a
check is successfully imported and cleared, the Payments list shows the value
of the following fields:
Cleared - Yes
Cleared Date - the cleared date from the import
Cleared Amt - the dollar amount cleared from the import.
Security
Your assigned role's "Bank" security object must be set to View or higher for you to import cleared checks.
The
Cleared Check Import Process
When you upload a check information file, the system performs
these steps:
-
Validates the file - The application verifies that the file
contains check information and determines if the file format is correct.
-
Reads the file - The application reads the file.
-
Processes the file to generate individual check lines.
If any step cannot be completed because of errors,
the errors are logged.
To create and edit the .csv file
- Generate a .csv export file using a utility, or create the
file manually. The file name must be unique.
- You may be able to generate an output file in .csv format using a utility
or system at your site.
- Otherwise, you can open a new spreadsheet or .txt file and populate it
with the data that you will import into Accounts Payable. (If you use a spreadsheet,
make sure that your spreadsheet program can save the file in a .csv format. )
Note: For editing the .csv file, a text
editor is preferable to a spreadsheet program. Spreadsheet programs (e.g.,
Excel) add commas for blank columns. The application cannot process trailing commas.
Also, the spreadsheet column formats must match the formats expected by
the application. Simply saving your file from the spreadsheet does not guarantee
that the column formats will be correct. For this reason, editing and saving
a .csv file as text is better.
- Open the comma-separated file that you made in the previous
step and edit it so that the format is correct. The format must contain the
fields as shown in this example.
Field sizes are described in this
table.
Click example to see an example
of a .csv file that contains three checks:
- Rows 1 contains three fields: the words ClearCheck,
the Customer ID, and the Date/Time.
- Row 2 contains the labels for the columns of data. You must
include this row in your file.
- Rows 3 and on are for your data.
- Edit your data as needed.
- Add the following end-of-file marker
after the last line of comma-separated data, on a line by itself:
<EOF>
- Save your file (as type .csv) and close the spreadsheet program.
Important:
Your file must contain <EOF>, by itself, on the last line.
- If your file was generated automatically, you will need to
add the final line containing "EOF".
- Open the spreadsheet in MS Notepad (or another text editor)
so that you can see the data as lines containing commas.
- Add the following end-of-file marker
after the last line of comma-separated data, on a line by itself:
<EOF>
- Save the file and close the editor.
To import check files:
- From the Accounts Payable main Contents, select Imports/Exports
> Clear Checks Import. The Cleared Checks Import list appears (Figure
1). The list contains check files that have been uploaded.
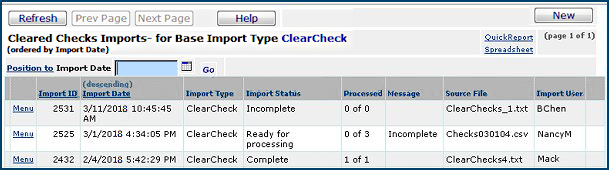
Figure 1 - Cleared
Checks Import List
- Click New. The Import panel appears
(Figure 2).

Figure 2 - Import Cleared Checks
- Enter the file that you wish to import
in the File to Upload field.
- Click Browse (on Microsoft IE or Edge) or Choose File (on Chrome) to locate the file.
- Click on the file to select it.
- At this step, you have a choice. You can work through the
import process in two stages or in one stage. For new users of this feature,
we recommend the two-stage approach.
- The two-stage approach first loads the .csv file and
validates it. Once the file has successfully loaded, you can import the information
into the application.
- Select the box labeled Load and Verify,
No Import.
- Click Submit. The system attempts to upload
your file and validate it. If upload is successful, a message appears. If
the system cannot upload your file and validate it, error messages appear. Read
and close the error messages. Make changes as needed in your .csv file
and try the upload again. Debugging information
is described below.
- The Cleared Checks Imports list appears.
- Click Refresh to see your file listed.
- The one-stage approach loads and immediately processes
the file. This method is efficient if you are confident that your .csv
file will not contain many errors.
- Click Submit. The system attempts to upload your file
and validate it. The Import List appears.
- Click Refresh to see your file listed.
- Review the Import List entry for your file. The following
fields provide useful status data:
Import Status Desc - The successful
or unsuccessful status of the import process.
Incomplete: The .csv file could
not be read or validated. (Check for errors.)
Ready for Processing: If you
have used a two-stage upload, the file is ready for the second step.
Processed - The number of data
records processed out of the total uploaded. This number shows how many of the
import file records successfully generated check lines.
n of X: X is the number
of records uploaded and n is the number of records processed.
For a one-stage upload, this
field indicates whether the system was able to generate check lines using the
imported file's records, and, if so, how many. 0 of
X means that the system was not able to generate check lines using the imported
file's records. Click Menu > View Import Details. The Import Details list appears, and you can review your data for errors.
For a two-stage upload,
0 of X is normal.
To complete processing of your import
file:
If you are using the one-stage approach, the system has
run the import step for you. You can review any errors, and begin fixing
any problems.
If you are using the two-stage approach, you need to
process the file that you uploaded. Do the following:
- From the main Contents, select Imports/Exports > Clear
Checks Import. The Cleared Checks Imports list appears.
- Locate the file that you wish to process.
- Click Menu > ReProcess the system asks you to verify
that you wish to reprocess the file.
- Click Submit.
- the system tells you how many records were successfully processed,
and how many contained errors.
- If you have no processing errors, then you are finished,
and the Import Status Desc is Complete.
- If you have errors, Import Status Desc contains the
value Errors. See "To debug your
import file" to correct the errors and click Menu > ReProcess
again. You may need to make changes in your .csv file and re-import the file.
To debug your import file:
You can encounter errors at any or all of the stages of cleared
checks file import. Error messages provide information about problems with the
.csv file. In most cases, you will wish to alter your .csv file.
At the validation and
reading stages:
- Check that the file name and path are correct.
- Make sure that the import file is a .csv file.
- Verify that your file has the header line.
- Check that you have included lines containing the correct
column names, in the correct order, and that none are missing.
- Check that the correct number of fields are in the import
file for each record.
- Check that the file contains <EOF> on the last
line.
At the processing stage:
When you select Menu > ReProcess, the system attempts
to create check lines using the imported file. The number of checks successfully
created appears on the Import list, and errors in processing each record are
logged. To see the errors:
- Click Menu > View Import Details. The check lines
appear.
- Review the Processed field for each check to determine
which have errors. Yes indicates that the check line was successfully
created. If the field is empty, a check line could not be generated from the
import file.
- Click View Errors to get a list of the problems with
the check. In most cases, you will want to go back to the .csv file, correct
the data, and re-import the file.
Import
Errors
The following
errors can occur if you have not included critical information in your
records:
- If the Bank and Bank Account fields
are not set up for the organization that issued the check, the check import
line is not processed and an error message is written.
- If the Check Number does not exist in
the Payments list (Payments > Payments), the check import line is
not processed and an error message is written.
- The Cleared Date must be a valid date.
Otherwise, the import line is not processed and an error message is written.
- The Cleared Amt must equal the
Payment Amount on the Payments list. Otherwise,, the import record
is processed, but an error is logged.
- If the Payment Status value on the Payments list cannot be Voided. Otherwise, the import line is not processed
and an error message is written.
Copyright © 2023 by Premier Inc. All rights reserved.