Department-to-Department and Department-to-Inventory Quick Credits Version
Contents
Overview
Department-to-Department
Quick Credits is designed for situations in which you need to process multiple
item credits between departments. With Quick Credits, you can credit multiple
items from one department to another in a single step. The only constraint is
that both the "credit to" department and the "credit from"
department must have the same valid supplying asset location.
Quick Credits for single items can also be created from the Materials Management Inventory menu. Quick Credits created from the Inventory menu bypass the pick process. The system automatically adjusts the on-hand inventory quantity. Use this path:
- From the Materials Management main Contents, select Inventory > Item Inventory or Inventory > Item Inventory - All Locations.
Select Menu > Quick Credit from Department next to the item of interest.
Mobile Applications on the iPad
If you are an iPad user, documentation for department-to-inventory returns is available from the Quick Start Guide on the iPad.
Financial Reporting Fields
Your site may be set up to use Financial Reporting Fields in various parts of the application. Similarly, you may also be using Project Codes and Fund Codes.
Financial Reporting Fields, along with Project Code and Fund Code let you generate reports on non-account code fields. For example, your site might define Physician as a financial reporting field. Users could then select the physician name associated with a quick credit, for example.
If financial reporting fields are used by your site, the tab Fin Reporting appears on the panels. (Otherwise, this tab does not appear.) You can enter field values on the tabbed panel.
Details are in Using Financial Reporting Fields in ERP.
Security
Users processing Quick
Credits must have the proper authority set in the system. To assign authorities
to a user, see the discussion of User Settings.
To access organization, department, or asset location data, the organization, department, or asset location must be included in your data profile.
- In your user profile, the Allow Dept to Dept Quick Credit field on the User
Settings Authorities panel must be selected for the user.
- To create Department Quick Credits, users must have the "Credits" role object set minimally to Create.
Creating Quick Credits
Quick Credits can be created from either the Warehousing or Inventory menu. Quick Credits created from the Inventory menu bypass the pick process -- no pick list is built. The application automatically adjusts the on-hand inventory quantity.
Department-to-Department Quick Credits:
-
From the main Contents,
select Warehousing > Quick Credits. The Quick Credits transactions list appears (Figure 1).
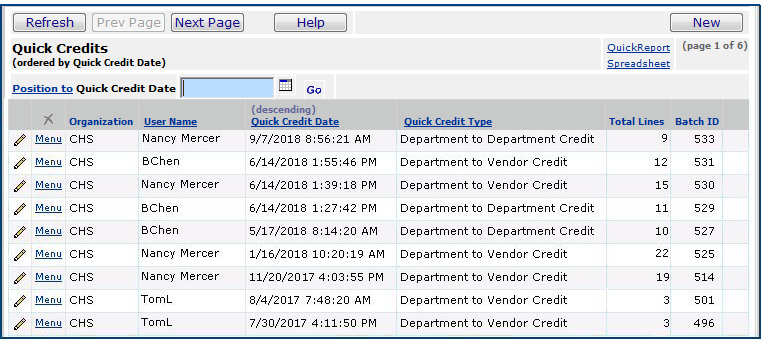
Figure 1 - Quick Credits Transactions List
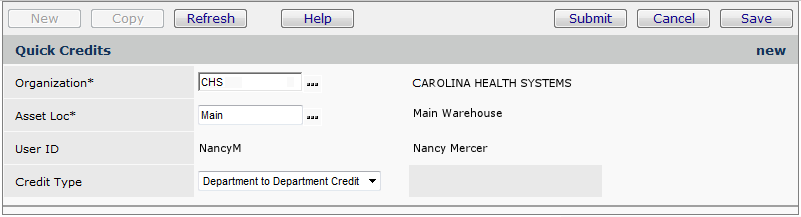
- Click New. The Quick Credits panel
appears (Figure 2).
Figure 2 - Quick Credits Panel
-
In the Credit
Type field, select Department to Department Credit. (It should
be automatically displayed.)
- Click Submit.
The File Items, Non-file Items, and Overrides tabbed
panels appear. At the bottom is the Quick Credit Lines panel with
No Data (Figure 3).
Figure 3 - Department to Department Quick Credits Edit Panel
- Complete the fields on the File Items panel for any file items that
you need to credit to/from a department. (Click Help for information
on the fields.)
- On the Non-File Items panel, complete the fields for any non-file items that you
wish to credit.
- If your site does cross-organizational processing of items,
you can transfer items between different organizations, as well as between
different departments within an organization. See the discussion of cross-organizational
processing for details.
- You can override the department charged for the items.
For any overrides, click the Overrides tab, and complete
the applicable fields.
- When you have entered information in the fields for an item click Save.
- Click Submit.
- The item appears on the Quick Credit Lines panel.
- You can enter more items, if you wish.
- When you are finished entering items, click Finish
Now (to submit the Quick Credit immediately) or Finish Later
(if you want to come back to it for more work later).
- When you click Finish Now, the system sends you a
message that asks you to verify submitting the Quick Credit.
- Click Submit. You are returned to the Quick
Credits list. The application creates and completes credit requisitions. Inventory is adjusted and inventory transactions are created.
- Clicking Finish Later returns you to the Quick Credit list. The Quick Credit request stays open for you to finish at another time. You can view or use the Quick Credit from the Quick Credits list.
- Cancel deletes the Quick Credit request.
- Click Refresh to see your Quick Credit on the list.
How ERP Determines the Materials Tax for Department-to-Department Quick Credits
Department-to-department quick credits use the From Department, Default Supplying Asset Location, or Default Supplying Org.
The materials tax rate for department-to-department quick credits is determined by ERP following the hierarchy in Table 1:
Table 1 - Hierarchy for Determining Materials Tax on Department-to-Department Quick Credits
| Item Type |
Check MM Tax flag at: |
Is tax set? |
When Yes: Tax Calculation Hierarchy |
| Non-Stock and Non-File |
From Department |
Yes = Calculate tax
No = Do not calculate tax |
From Department > From Department's Default Supplying Asset Location > From Department's Default Supplying Org |
| Stock |
From Department's Default Supplying Asset Location |
Yes = Calculate tax
No = Do not calculate tax |
From Department's Default Supplying Asset Location > From Department's Default Supplying Org |
Department-to-Inventory Quick Credits
Department to Inventory quick credits provides a simple way for departments to return items to inventory, and avoid creating manual credit requisitions.
This credit type is available for selection from the Quick Credits edit panel (Figure 4).
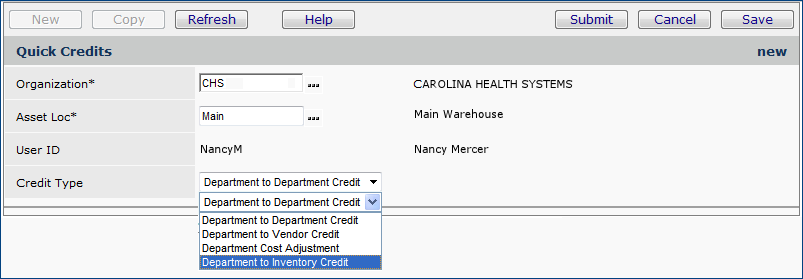
Figure 4 - Creating a Department to Inventory Quick Credit
Users who create Department to Inventory Quick Credits must have the authorization set on their user profile's Authorities tab. The field
Allow Dept to Inventory Quick Credit must be selected (Figure 5).
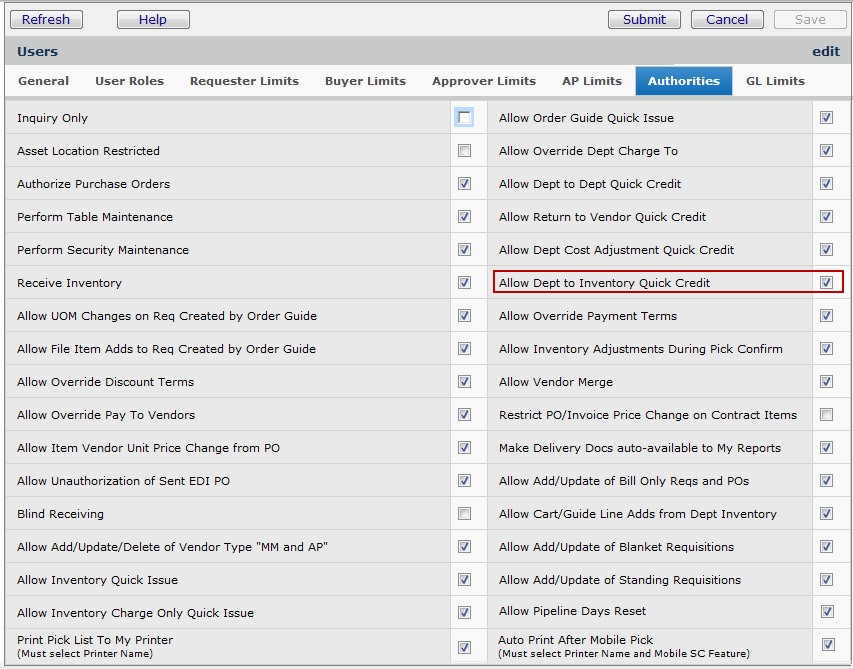
Figure 5 - Setting a User's Authority to Create Department to Inventory Quick Credits
To create Department to Inventory Quick Credits:
- From the Materials Management main Contents,
select Warehousing > Quick Credits. The Quick Credits transactions list appears.
- Click New. The Quick Credits header panel
appears (Figure 4).
- In the Credit
Type field, select Department to Inventory Credit.
- Click Submit.
The File Items and Overrides tabbed
panels appear (Figure 6). Initially, the Quick Credit Lines panel (at the bottom) contains
No Data.
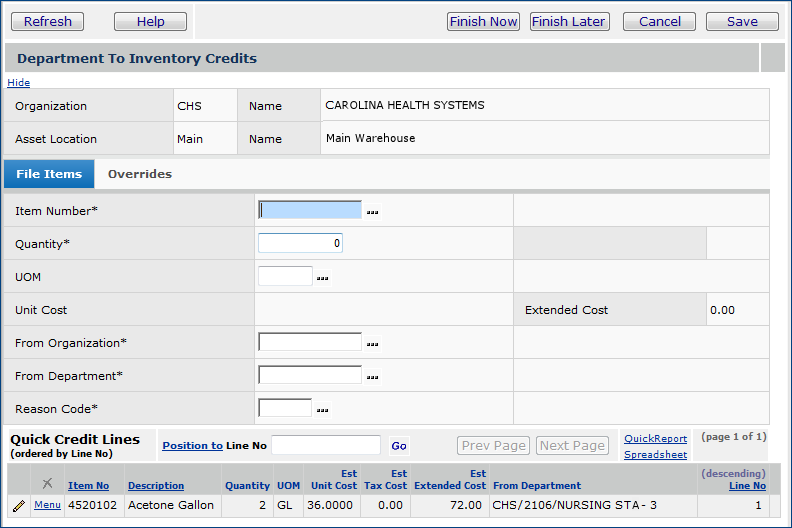
Figure 6 - The Department to Inventory Quick Credits Edit Panel
- Enter values in the fields marked with an asterisk (*).
- Item Number - A stock or non-stock item.
- Quantity - The quantity of the item to be credited.
- UOM - The unit of measure for the credited quantity.
- From Organization - The crediting organization.
- From Department - The crediting department.
- Reason Code - A reason for the return to inventory.
- Click Save and Refresh.
The item is listed in the Quick Credit Lines panel (at the bottom).
You can edit, delete, or add notes to any item in the list.
- Repeat Steps 5 and 6 until you have entered all the items.
- Click Finish Now to run the job. The system creates and completes Quick Credit requisitions. Inventory is adjusted and inventory transactions are created.
Finish Later leaves the Quick Credit request open for you to finish at another time. You can view or use the Quick Credit from the Quick Credits list.
Cancel deletes the Quick Credit request.
How ERP Determines the Materials Tax for Department-to-Inventory Quick Credits
The materials tax rate for department-to-inventory quick credits is determined by ERP following the hierarchy in Table 2 (for stock and non-stock items only).
Table 2 - Hierarchy for Determining Materials Tax on Department-to-Inventory Quick Credits
| Item Type |
Check MM Tax flag at: |
Is tax set? |
When Yes: Tax Calculation Hierarchy |
| Non-Stock |
From Department |
Yes = Calculate tax
No = Do not calculate tax |
From Department > Supplying Asset Location (the inventory that the item is going back to) > Supplying Org |
| Stock |
From Supplying Asset Location |
Yes = Calculate tax
No = Do not calculate tax |
Supplying Asset Location > Supplying Org |
Flow of processing in Quick
Credits
When you use Quick Credits, the application does the following:
- Creates a requisition with type Department Transfer for the items
specified on the Quick Credit.
- A requisition is created for each "To/From" department combination
and reason code.
- The "To" department owns the requisition.
- Sets the requisition to Approved and Complete.
- Item on-hand quantity and inventory values do not change since a Quick
Credit has no inventory impact.
- Creates a new inventory transaction of type Dept to Dept Transfer Out
for each item to reflect that the item is leaving the source department.
- Usage for the item in the source department is decremented.
- Item expense in the source department is decremented.
- A credit expense to the source department is created in GL transactions.
- Creates a new inventory transaction of type Dept to Dept Transfer In
for each item to reflect that the item is entering the target department.
- Usage for the item in the target department is incremented.
- Item expense in the target department is incremented.
- A debit expense to the target department is created in GL transactions.
- Adjusts project and/or fund current expense amounts if needed.
Note on Refresh button
Refresh refreshes lines. Use F5 to refresh the
entire panel.
Copyright © 2023 by Premier Inc. All rights reserved.