Create an Item Record in the Item Catalog Version
Contents
Overview
Materials supply in a medical
center can be organized in multiple ways, depending on whether the hospital
maintains item inventories, operates as a "stockless"
environment, or combines both methods.
Some hospitals handle their departments' supply needs
by maintaining inventories of items. In such hospitals, items may be kept in
a physical location that accepts departments'
requests for items, and then issues the requested items from stock. As items
are distributed, the inventory is replenished
to meet future requests.
Other medical centers may use a "stockless"
supply process. These hospitals do not keep items in inventory, although they
may have an area that handles receiving and distribution. Items are ordered directly from vendors and delivered directly to departments.
Regardless of the supply structure, a medical
center needs a master catalog of items that it purchases.
The Supply Chain item catalog contains a record of each item that
a hospital generally purchases and uses in its normal functioning. Items
recorded in the item catalog are called file items. A cataloged item
can be designated as stock (kept on hand) or non-stock (not kept
on hand, but ordered as needed).
Note: Hospital departments may occasionally need non-file items — items that
are not listed in the item catalog. Supply Chain handles the request, purchase,
receipt, invoice, and payment processes for non-file items as well as file items.
If you create item records manually, use Consolidated Item Add. With Consolidated Item Add, you
can create item catalog and item inventory records in one step. All of the crucial item information
areas are included.
Powerpoint Walk-Through
Click here for a short PowerPoint introduction to item record creation.
Security
If you create new item records, the appropriate authority
must be set in your Supply Chain user profile.
The role object "Item Add" allows you to add items to the item catalog.
- The minimum setting is Modify.
- If this role object is set to None, you will not see Consolidated Item Add on the main Contents.
The role object "Catalog" controls authority over item catalog maintenance.
- The Catalog role object (Maintain Item Catalog) must have its security level set to Create (or higher), and must be included in the
role that is assigned to your User ID.
- The minimal setting to be able to maintain item catalog records is Modify.
The "CatalogAssign" role object governs permission to assign items to an asset location.
- The initial setting of the "CatalogAssign" role object is the same as the "Catalog" role object setting.
- The minimal setting to be able to assign items is Modify.
To access organization, department, or asset location data, the organization, department, or asset location must be included in your data profile.
See Set Up
and Maintain Users, and consult with your system administrator.
Assignment of Item Records to Asset Locations
An asset location is a collection of many items' records including item vendor records, manufacturer information, contracts that govern each item, prices, statistics, and more. A hospital might set up one asset location for the operating room suite; for example, and another for nursing stations, if the hospital prefers to handle supplies according to the surgical and patient care functions.
When you create an item, you can assign it to asset locations as part of the creation process.
Departments' requests for items (which may generate purchase orders) and the filling of requests take place through asset locations.
- For hospitals that keep an inventory of supplies in house, asset locations can be associated with actual physical areas, such as storerooms.
- In a stockless environment (where vendors deliver orders directly to hospital departments), or for a combined inventory/stockless configuration, asset locations are the repository for the data that allows users to request items, and for the hospital to manage the supply chain.
When you use Consolidated Item Add, Supply Chain automatically assigns the newly-created item to the Organization, Supplying Organization, and Asset Location displayed in your Current Settings. The asset location record for the item is called the item inventory record.
After you save the vendor information, the Assign Catalog Item to Asset Locations panel appears. On this panel you can choose one or more asset locations from the list and assign them the catalog item that you are creating. The list is based on how your hospital system is structured. For example, it could include asset locations within the same organization and also within different organizations. Each asset location line includes Item Type, Multi-Source, Item Status, Organization, Description, Asset Location, and Description. See the section Assignment of a Single Catalog Item to Multiple Asset Locations.
Also, you can assign existing items to one or more additional asset locations.
If you added item Notes after you created the item catalog record, you can copy the notes to the item inventory record when you assign the item to an asset location. See Adding Notes to an Item.
Taxable Items
The taxable flag setting defined for an organization is now picked up for new items (created by Consolidated Item Add) for asset locations that the items are assigned to.
When new items are created using Consolidated Item Add and assigned to asset locations, ERP uses the Calculate Tax for Materials Transactions flag (Figure 1), for the organization to identify taxable items.
When the organization’s Calculate Tax for Materials Transactions is selected (Figure 1), item inventory records for asset locations in the organization must also indicate that the item is taxable (Figure 2).
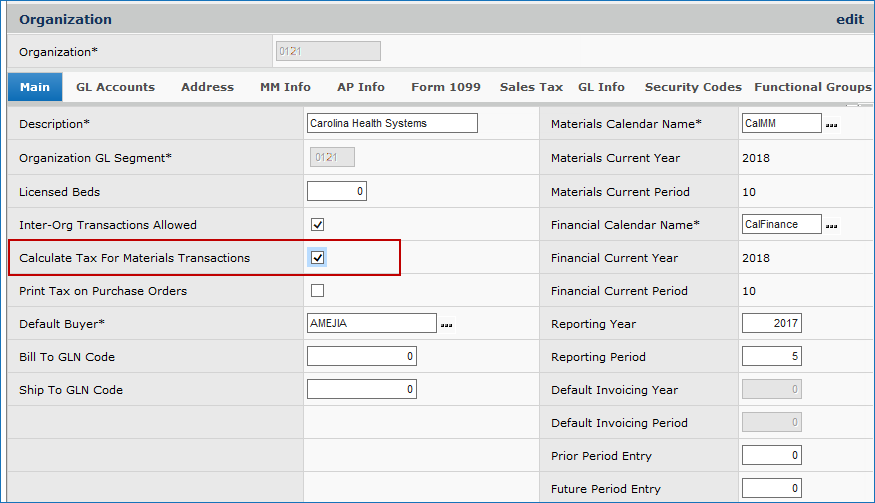
Figure 1 - Calculate Tax for Materials Transactions Field on the Organization
If an organization requires tax, that information is propagated to the Item Inventory record when an item is created using Consolidated Item Add and assigned to asset locations associated with the organization.
Figure 2 displays the Taxable field set for the item inventory record.
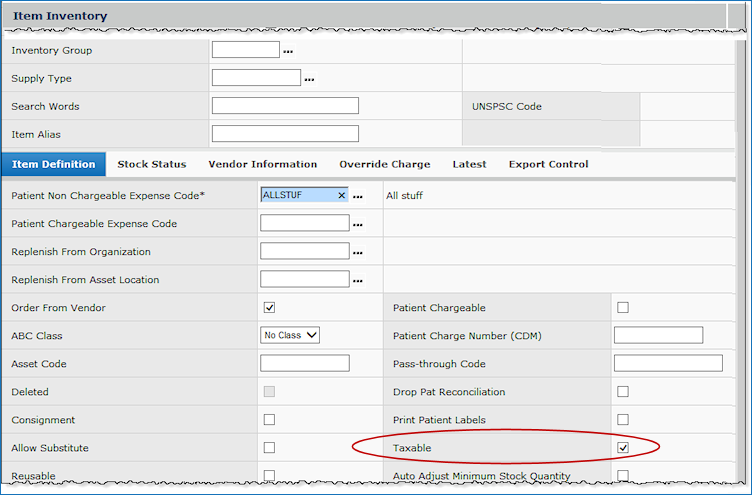
Figure 2 - Item Inventory Record in a Taxable Organization’s Asset Location
(Of course, when the organization’s Calculate Tax for Materials Transactions is unselected, then the item inventory records for asset locations in the organization have the Taxable field unchecked, and the items are not taxable.)
Note: Accounts for tax expenses on the Organization record also need to be specified when the organization’s items are taxable.
*PUBLIC Item Vendor Records
When you use Consolidated Item Add to create a new item, Supply Chain designates the item vendor records " *PUBLIC." Supply Chain then makes the *PUBLIC item vendor records automatically available to the default supplying asset location for the organization. When you assign the item to other asset locations, Supply Chain shares the *PUBLIC item vendor records with those asset locations as well.
Your site may also use multi-sourced items. These items have unique sourcing information — different from the *PUBLIC item vendor record — for one or more asset locations.
If you also are responsible for creating new purchase orders, you can add an
item to the item catalog from the Purchase Order Non-File Item Entry panel.
For details, see Create a PO Manually
- Using the Enter Non-File Items Panel.
To create a new item:
- From the Materials Management main Contents, select
Inventory > Consolidated Item Add. The Consolidated Item Add panel
appears (See Figure 3 and the other figures below.)
The cursor in the panel is positioned in the Description field.
- Complete the required fields on the Consolidated
Item Add panel header and tabs.
A detailed discussion of the fields, by tab, is below.
- Click Save to periodically save information
as you are working.
- When you are finished entering information, click
Submit.
If there are no errors, you receive a message that your item has been added
to the item catalog.
Important: You can add an item to the catalog by
entering information in the required fields only. However, unless you enter vendor information for the item, the item will
not be complete. You will need to come back to the item, and enter missing information.
Completing the Tabbed Panels for Consolidated
Item Add
The sections below provide a detailed discussion of the fields on the Consolidated
Item Add panel, and how the fields are related to each other.
Note: If you are using Sourcing and Contract Management, the Contract Information tab (Figure 3) does not appear on the Consolidated Item Add panel. In Sourcing & Contract Management, information about contract items is imported, so contract data does not need to be entered manually.
Users at Product Index Layer (PIL) Sites
When adding an item to the Supply Chain item catalog, you can now use the Product Index Layer (PIL) to find and select the item. The Manufacturer Item No (MIN) field on the Consolidated Item Add panel's Vendor Information tab lets you select an item from the PIL. When you select the manufacturer item, the system populates several fields on other panels with PIL data for the item.
Also, if you wish, you can override the MIN by keying in a different value in the Manufacturer Item No field.
This feature is only available for sites that have Supply Chain. See Using the Product Index Layer When Adding an Item to the Item Catalog.
Notes:
- If you wish to use this feature, contact the Help desk. Your site must have the PIL enabled.
- Also, a system flag must be set for PIL access with Consolidated Item Add.
The Consolidated Item Add header panel (Figure 3) contains the item number. The General tabbed panel contains basic information about the item.
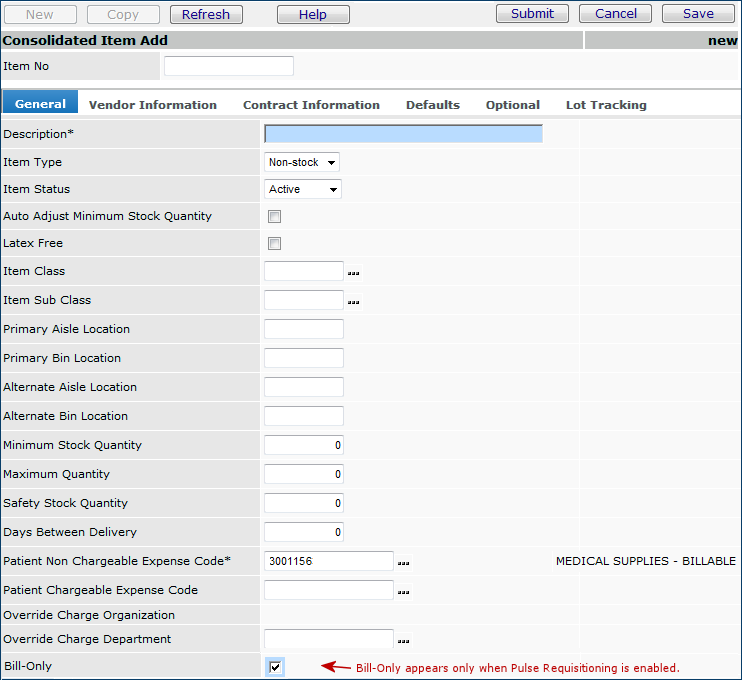
Figure 3 - The Consolidated Item Add Header and General Panel
- Item No - The
Item No field is for an item number or code that uniquely identifies
the item. It can be numeric, alphabetical, or both.
-
Your site may have in place a numbering plan for items based on item class,
stock or non-stock status, or some other criteria. If so, you can enter a
new item number consistent with whatever numbering structure your site has
established. However, you do not have to enter a value in this field. If you
leave this field empty, the system assigns an item number for you.
- Item Description - Enter an Item
Description.
- Auto Adjust Minimum Stock Quantity - You may wish to
set a minimum stock level for items whose usage and delivery schedule you
know.
-
You can instruct Supply Chain to automatically adjust the Minimum Stock Quantity.
Do this by selecting Auto Adjust Minimum Stock Quantity. Supply Chain uses
the Days Between Delivery field in calculating the minimum stock level.
If you select Auto Adjust Minimum Stock Quantity, enter a value in
Days Between Delivery.
-
Alternately, you can set the minimum stock quantity of the item manually.
Enter a value in the Minimum Stock Quantity field on the
General panel.
-
You can also leave minimum stock quantity unspecified.
- Item Status - Select Active if you wish users
to be able to request and order the item. Otherwise, select Inactive.
- Incomplete is used by ERP when required item information is missing
from the item record. Often, the missing information is vendor data.
-
If an item is set to Inactive, ERP will continue to issue any remaining quantity until depleted.
Important: To be activated, the item record must contain complete Item Vendor information, and the Primary Supplier of the item must be set. Until this
information is available in the item record, Supply Chain shows the Item Status as Incomplete, and will not let you change the Item Status to Active.
Example Scenario: The Item Status field is useful, for example, if you are introducing a new stock item to replace an old one.
In this case, you can create an item record for the new item and set the Item Status to Inactive. Then set the Item Status of the old item to Inactive. Although the old item is inactive, Supply Chain will let you issue the item until current stock is deleted; but will not order more. At this point, you can set the new item to Active, and begin using it.
Notes on Inactive Items
An item can be made "inactive" if the on-hand
quantity is zero or greater than zero. Existing backorders will be retained
and can be relieved through receipts.
The response
formula will ignore all "inactive" items. The system will not
accept purchase orders that contain "inactive" items.
You can list an "inactive" item on an Order
Guide or Par Cart requisition, or place the item on an Order Guide, provided
that the item has on-hand quantity. If there is no on-hand quantity, the system
sends an error message.
- Patient Chargeable/Non Chargeable Expense Codes - When your site has GL Validation enabled, an invalid expense code in either of these fields will cause the item to be Incomplete. Enter valid codes from the Expense Codes table.
- Bill only - This field appears when Pulse Requisitioning is enabled at a site. When selected, non-stock items requisitioned in Pulse create bill-only lines. When unselected, bill-and-replace lines are created on Pulse requisitions.
- Item Type - Select Stock
if you expect to maintain an inventory of the item. Select Non-Stock
if you expect to order the item from vendors as needed.
-
Stock items are warehoused in an asset location. The asset location issues
the items to departments. When the supply in the asset location runs low,
the asset location is replenished either by another asset location (in a multi-organizational
environment) or by a purchase order to the item's vendor. Supply Chain calculates
the point when stock items need to be reordered, and puts reorder information
on the Suggested Order List.
-
Consignment items are considered stock items. See the Consignment
field.
- Latex Free - Select this field if the item is latex
free. For example, exam gloves can contain latex, or not.
The General panel (Figure 3) contains additional basic details.
- Item Class - A category your site has defined, such
as "Lab," "Dressings," "Food Service." Item classes are
set up in the Item Class Table.
- Item SubClass - A subcategory under each item class.
For example, the "Lab" class may have subclasses such as: "Reagent,"
"Glassware," "Instrumentation Supplies," etc.
- Primary Aisle Location / Primary Bin Location - If the
item is inventoried, these fields are its default aisle and bin location.
Their values populate the same field on the item inventory record, but you
can override the values on the item inventory record.
- Alternate Aisle Location / Alternate Bin Location -
If the item is inventoried, these fields are the default secondary aisle and
bin location.
- Minimum Stock Quantity
- Enter a value in this field if you wish to set the Minimum Stock Quantity
manually. The header field Auto Adjust Minimum Stock Quantity should
be unchecked.
- Maximum Stock Quantity - Enter a value in this field
if you wish to set the Maximum Stock Quantity. For example, you may have space
constraints in the asset location for a large item that you inventory, and
can store only a limited quantity.
- Safety Stock Quantity
- Enter a value in this field if you wish to set a "safety" quantity
of the item. The Safety Stock Quantity is the minimum acceptable
stock quantity for an item. This value may not necessarily equal the Minimum
Stock Quantity.
- Days Between Delivery - Specifies the number of days between deliveries by the vendor for
this item. If you enter a value in this field, and select Auto Adjust Minimum
Stock Quantity, Days Between Delivery will be used in the calculation
of Minimum Stock Quantity (Days Between Delivery * Average
Daily Usage.)
- Patient Non-Chargeable Expense Code - An account code
for items that are not billed to patients. "Non-chargeable"
is the default.
- Supply Chain automatically selects the expense code, but you can
change it by clicking the prompt (...) to access the Expense Code Selection list (Figure 4).
-
You can also enter an expense code from the keyboard. Enter up to 15 characters. This value may be set as a default in the organization record.
-
See also the Patient Chargeable field.
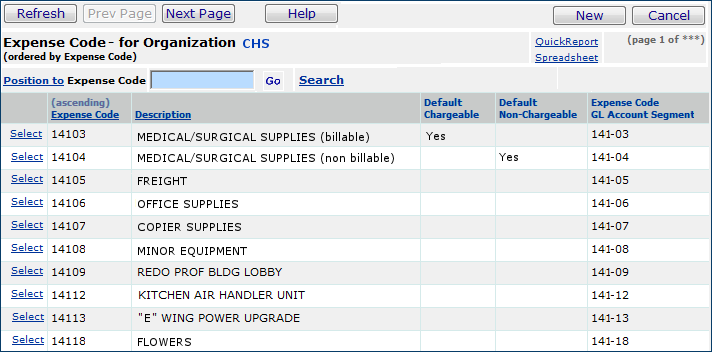
Figure 4 - List of Selectable Expense Codes for Patient Charging
- Patient Chargeable Expense Code - An account code for
items that are directly billed to patients. This field is required
if the Patient Chargeable field on the Defaults panel is checked.
-
Click the prompt (...) to select an expense code from the codes set
up for your organization. (See Figure 4.)
-
You can also enter an expense code from the keyboard. Enter up to 15 characters.
-
See the Patient
Chargeable field description.
- Override Charge Organization - If the normal organization
is not charged for the item, the code for the organization that is charged
appears in this field. This situation may occur in a multi-organizational
environment.
- Override Charge Department - If the normal department
is not charged for the item, select the code for the department that is charged
from the prompt. If specified, this department will always receive the charge
for this item. When you specify Charge Override for a PO, Item, Order Guide,
or Par Cart, only those departments that have been defined in your data profile
are valid for selection.
The Vendor Information Panel
The Vendor Information panel (Figure 5) contains fields that are crucial to
the item record. Without this information, the item record is Incomplete.
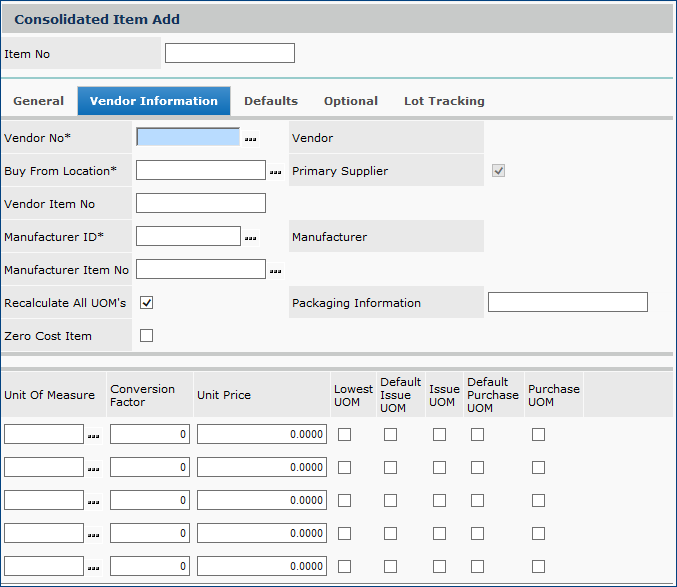
Figure 5 - Consolidated Item Vendor Information Panel
On the center of the Vendor Information panel, enter the item vendor, manufacturer,
and the codes for the item.
On the lower part of the Vendor Information panel, specify the units of measure in which the item can be issued and ordered,
the cost of each unit of measure, and the conversion factor for each. A discussion
of the fields is below.
- Primary Supplier - If the item is supplied by multiple
vendors, this field (when checked) indicates that the vendor specified in the
Vendor No field is the main supplier of the item.
- Manufacturer ID - The identifier for the
item's manufacturer. The manufacturer cannot be changed once you complete
the item record.
- Manufacturer - The manufacturer's name.
- Manufacturer Item No - The manufacturer's code or
item number for the item, also called the MIN.
-
For Product Index Layer (PIL) sites: Clicking the prompt (...) opens a list of PIL items. You can select an item from the PIL. Alternately, you can key in a MIN if you wish to override the Product Index Layer's MIN.
- Recalculate All UOMs - This field is useful when you
need to change the price of the item in the future. Select this field to recalculate
all UOM prices based on a new price for the lowest UOM. The system
asks you to confirm changes before it makes them.
- Zero Cost Item - The item is a no-cost item. This flag cannot be set to ON if the item is a contract item or if non-zero prices are present.
- Vendor No -
The identifier for the item's vendor. The vendor cannot be changed
once you complete the item record.
- Vendor - The vendor's name.
- Buy From Location - The vendor location that the item
is usually purchased from. This is the location where orders are sent. You cannot change the Buy From Location for an item catalog record once the record is complete.
-
A
vendor may have one, or several buy-from locations. See the discussion of Working With Vendor Information - Basics.
- Vendor Item No - The vendor's identifier for the item. The system populates this field.
- Packaging Information - Any notes or instructions about packaging.
- Unit of Measure - In this column, click the prompt in each row to select the unit of measure. You must select at least
one unit of measure, as the lowest. You can select up to five.
-
In other fields on the Vendor tab, you can specify which is the lowest unit
of measure, which units of measure are used for purchase orders and for issuing
to departments, and other information.
Important: Each item must have a unit of measure designated as the lowest, the default issue UOM, and the default purchase UOM. These can be the same, or different UOMs. In other words, the lowest UOM could also be the default issue UOM and the default purchase UOM.
- Conversion Factor
- For the lowest unit of measure: Enter the number 1.
- For any other unit of measure: Enter the number of times that each higher
unit of measure can be divided by the lowest unit of measure.
For example, suppose an item is available as "each" EA - the lowest
unit of measure. And, the item is available in a box - BX.
If a box contains ten "each" of the item, then the conversion factor for BX
is 10.
- Unit Price - Enter the vendor's price of the
item per unit of measure. For example, you may have an item available at a
price of $0.12 each (EA) and in boxes of 10 (BX) at a price of $1.20 per box.
You would enter $0.12 for the EA unit of measure and $1.20 for the BX unit
of measure.
- Lowest UOM - Select this box if the unit of measure
is the lowest unit of measure for the item, for example EA (each). This field
is required for the item to be active.
-
Note: If an item has multiple vendors, you need to
enter the same lowest UOM for all the vendors.
- Default Issue UOM - Select this box for the unit of
measure used by default for issuing the item.
- Issue UOM - Select this box if the item can be issued
in the unit of measure.
- Default Purchase UOM - Select this box for the unit
of measure used by default to purchase the item.
- Purchase UOM - Select this box if the item can be
purchased in this unit of measure.
Assignment of a Single Catalog Item to Multiple Asset Locations
After you enter and save the vendor information, the Assign Catalog Item to Asset Locations panel appears.
On this panel you can choose one or more asset locations from the list and assign them to a single catalog item. (Figure 6)
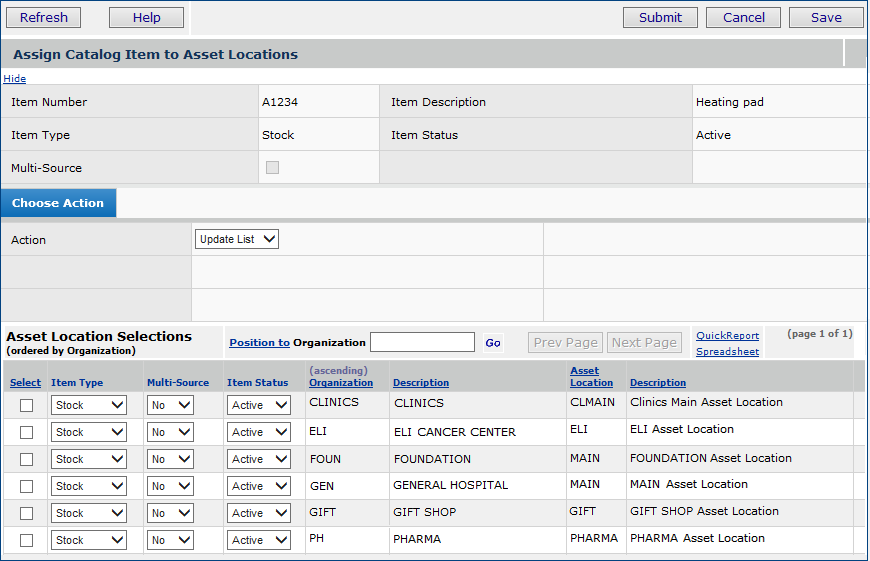
Figure 6 - The Assign Catalog Item to Asset Locations Panel
How to assign more than one asset locations to a single catalog item:
- In Asset Locations Selections, select a checkbox for each Asset Location that you wish to assign.
- You can also make changes to several asset locations at once, by using the drop down choices in Choose an Action.
-
For example, if you wish to select some, all, or unselect all the asset locations, click the correct drop down choice; Update List, Select All, or Unselect All.
- Then click Refresh.
Note: If you decide not to assign more than one asset location to a single catalog item, do not select any of the checkboxes on this panel. Instead, click only Submit, and do not complete steps 2 and 3. The system displays a warning that you have not selected any additional asset locations.
-
Click OK to dismiss the warning.
-
Then click Submit.
- If you wish, you can make changes to the values in the Item Type, Multi-Sourcing, and Item Status columns, even though there is an assigned default value.
- Item Type defaults to the stock status in the catalog; stock or non-stock.
- Multi-Source always defaults to "No." This cannot be set to "Yes" if the asset location does not allow it. Read more about multi-sourcing in Multi-Sourcing an Item.
- Item Status always defaults to "Active."
- After you are finished making selections, click Save, and then Submit.
- The Assign this Item dialog box displays.
- Click Submit to complete this action, or Cancel to stop this process.
- Go to Item Inventory, and find the item you just created.
-
For each line item, the same Item Number displays, with a different
Asset Location.
Fields on these panels:
- Item Number - The item number for the item you are creating.
- Item Description - The description of an item.
- Item Type - Select Stock if you expect to maintain an inventory of the item. Select Non-Stock if you expect to order the item from vendors as needed.
- Item Status - Select Active if you wish users to be able to request and order the item. Otherwise, select Inactive.
- Multi-Source - The checkbox is selected if the item is multi-sourced. These items have unique sourcing information — different from the *PUBLIC item vendor record — for one or more asset locations. Read more about multi-sourcing in Multi-Sourcing an Item.
- Choose an Action - Select Update List, Select All, or Unselect All to make changes to several asset locations at once.
- Select - Select a checkbox next to the asset location you wish to assign.
- Item Type - Select Stock if you expect to maintain an inventory of the item. Select Non-Stock if you expect to order the item from vendors as needed.
- Multi-Source - Select Yes or No. The checkbox is selected if the item is multi-sourced. These items have unique sourcing information — different from the *PUBLIC item vendor record — for one or more asset locations. Read more about multi-sourcing in Multi-Sourcing an Item.
- Item Status - Select Active if you wish users to be able to request and order the item. Otherwise, select Inactive.
- Organization - The code for the organization at your site.
- Description - The description of the organization.
- Asset Location - A code or identifier for the asset location.
- Description - The description of the asset location.
Setting Defaults per Asset Location
For single-sourced items, you can specify different default issue and default purchasing UOM settings, by asset location, for an item's primary supplier.
If multiple purchasing or issuing units of measure are available, you can set one of the UOMs as a new default for particular asset locations. See Assigning Default UOMs by Asset Location for Single Sourced Items.
The Contract Information Panel: for sites without Sourcing and Contract Management
Fields on the Contract Information tab (Figure 7) contain information about any contract that the item is part of.
- If you have Sourcing and Contract Management and are adding an unmatched contract item to the item catalog, the Contract Information tab does not appear on the Consolidated Add Panel. The system already has the contract information, since the item is listed on a contract, but does not have a match in the item catalog.
Otherwise, if you do not have Sourcing and Contract Management, when you create item records for new items, the Contract Information panel appears. Fields on this panel are listed below.
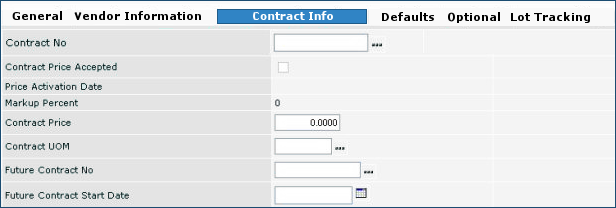
Figure 7 - The Contract Information Panel
- Contract No - The contract number of any contract that
governs the item. If you have Sourcing and Contract Management, see the Introduction to that application. Otherwise, if you are using the Materials Management Contracts panels, see Working With Contracts and
Contract Items.
- Price Activation Date -
The date when a new Contract Price for the item is effective. Once you activate a price, and the effective date arrives, the system uses the price in purchase orders.
- Contract Price - The latest price for the item available from the contract. The new price may be in effect "activated," or not yet put into effect.
- Contract UOM - The unit of measure for the Contract Price.
- Markup Percent - The percent vendor/distributor markup of contract items.
- Future Contract No - If a new purchasing contract has
been negotiated, its contract number.
- Future Contract Start Date - The start date for any
new purchasing contract, if a new one has been negotiated.
The Defaults Panel
The Defaults panel (Figure 8) lets you set several characteristics and default
values for the item.
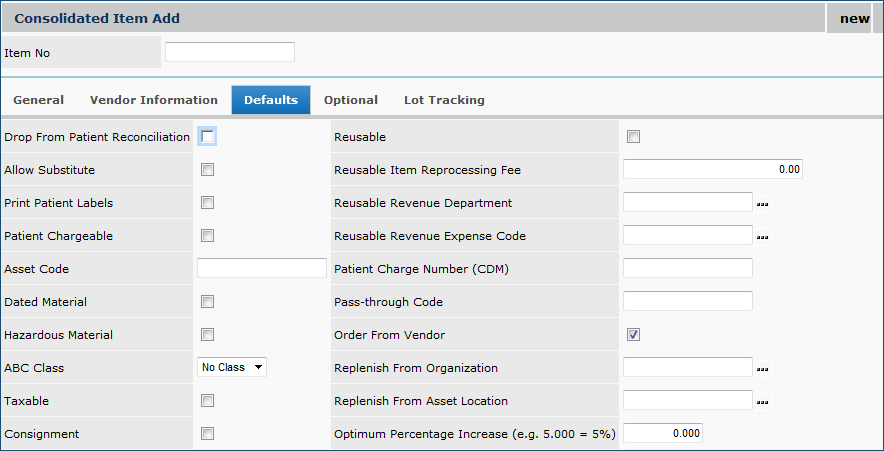
Figure 8 - Consolidated Item Add Defaults Panel
- Drop From Patient Reconciliation -The
Patient Charge Reconciliation Report shows quantities of patient-chargeable
items that have been issued, the quantity of each item issued that has been
charged to patients, and the quantity "lost" or not charged to patients. When
this box is selected, the item is not included on the report. See the
Patient Chargeable field and Recording
and Processing Patient Charges.
- Allow Substitute - This field appears on a purchase order. When checked, it signals to the vendor that the item can be substituted. The vendor would look up the item on a substitute table to ship a similar item in its place.
- Print Patient Labels - If checked, a barcode label
will print when the item is received.
- Patient Chargeable
- You can record patient charges against items that you requisition for patient
use. When this field is selected, the item is chargeable to patients. The
Patient Charge Reconciliation Report lets you view the quantities of items
that have been charged to patients, and the quantities not charged. See Recording
and Processing Patient Charges. Also, the Patient
Charge Number field may need completion.
- Asset Code - The asset code of item, if any. Reports
can be run against various codes, such as this one used in an item's
description.
- Dated Material - The item has a "use-by" date.
- Hazardous Material - When checked, indicates that the
item is hazardous material. The item is reportable on a standard hazardous
material sheet. See the MSDS URL field.
- ABC Class - A classification for an item based on a percentage of
the annual expense for all items. Typical percentages are:
A
= 20% (the 20% of the items that carry 80% of the expense)
B
= 30%
C
= 100% - Class B% - Class A%
Sites can define ABC classes based on annual item expenses.
Any item can then be assigned the appropriate
letter class according the percentage of the expense that it carries.
- Taxable - When checked, indicates that tax applies to
the item.
- Consignment - When selected, indicates that the item is a consignment item. Consignment
items are owned by the vendor who provides them, but are kept on site at a
medical center. Consignment items are replenished as they are used — "use
one, order one." You pay for consignment items only when you use them. Consignment
items are entered in the item catalog as stock items. See Processing
Consignment Items.
- Reusable - When selected, the item is a reusable item.
Durable items that can be used over and over are reusable. Departments to
which you issue reusable items do not get expensed for the purchase cost of
the item.
- Reusable Item Processing Fee - The dollar value which
departments are charged to "rent" a reusable item. Reusable items
may need processing (such as sterilization) before they can be issued again.
- Reusable Revenue Department - The department that receives the revenue from the "rental" of a reusable item. Enter this value if the item is reusable.
- Reusable Revenue Expense Code - The expense code for the revenue from the "rental" of a reusable item. Enter this value if the item is reusable.
- Patient Charge Number (CDM) - The hospital-assigned Patient Charge Number passes to the patient billing system for patient bills and/or insurance compliance.
Patient chargeable items issued to a department print on the patient reconciliation report. This value may be set as a default in the organization record.
- Pass-through Code - A code used for insurance billing purposes, such as a Medicare code. This value may be set as a default in the organization record.
- Order From Vendor - When checked, the item is ordered from a
vendor. Purchase orders for the item originate at the organization and asset
location to which the item is assigned. If the box is not
checked, the item is replenished through system transfer from the
organization
and asset location specified in Replenish
From Organization and Replenish From
Asset Location.
- If a Preferred Order Factor and a Preferred Order UOM are defined for an item (in the inventory location), how order quantities are determined depends on the setting for this field.
- When this field is checked for a stock item, and the Preferred Order Factor and a Preferred Order UOM are also entered on the item inventory record, ordered quantities for purchase orders are adjusted upwards by the UOM and UOM factor.
- When this field is not checked, ordered quantities for transfer requisitions are adjusted upwards by the specified UOM and UOM factor.
- Replenish From Organization - The organization that orders or replenishes the item if Order From Vendor is not checked.
- Replenish From Asset Location - The asset location that orders or replenishes the item if Order From Vendor is not checked.
- Optimum Percentage Increase - A manually entered optimum stock level percentage used to
modify reorder quantity as additional safety stock.
- For example, if the Optimum Percentage
Increase is set at 75%, then when the item comes up for reorder of
100, the optimum percentage increase would apply and make the
order 175.
- This value can be set when creating a new item with Consolidated Item Add, when creating an item inventory record or editing an existing one, and at the asset location, for application to all items in the asset location. The item inventory record setting takes precedence over any asset location setting for this value.
Automatic Default Values
When an organization creates a new item, the defaults specified (Figure 8) are written to the inventory record. If an organization sets the Assign Patient Charge Number (CDM) from Catalog and Assign Expense Codes from Catalog fields on its Organization record (Figure 9), the default values for CDM, Pass-Through Code, and Billable/Non-Billable Expense Code are retained on the item catalog record, and used to automatically populate any additional inventory assignments in the organization.
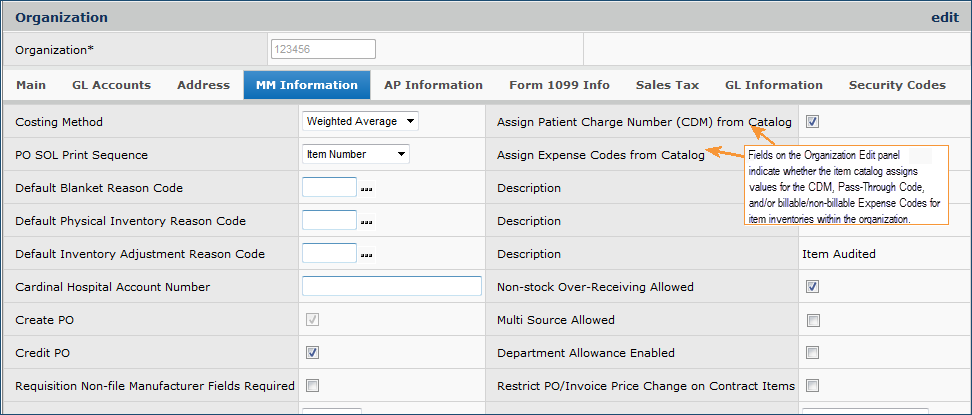
Figure 9 - The MM Information Panel for an Organization
Notes on Reusable Items
- Reusable items may be stock
or non-stock items.
- Reusable items are treated
like rental items and not depreciated. Thus reusable items may be "rented
out" and expensed for more than the original cost of the item.
- The department to which
a reusable item is issued is charged a "rental" fee for the item.
- Requisition or pick of a
reusable item generates only the issue portion of the transaction (no invoice).
- At release, the item inventory
record for a reusable item is not updated to reflect the allocated
quantity and to reduce available quantity.
- Reusable Revenue Department - The department that receives
the "revenue" from the rental of the reusable item.
- Reusable Revenue Expense Code - The expense code for
the revenue from the use of a reusable item.
This is a value that you must
first establish in the Expense Code table.
- Patient Charge Number (CDM)
- Also called the CDM. The Patient Charge Item No can be passed
to the patient billing system for patient bills and/or insurance compliance.
Patient chargeable items issued to a department will print on the patient
reconciliation report.
Assign a patient charge item number to the item in
this field if needed.
- Pass-through Code - A code that you may use for insurance
billing purposes, such as a Medicare code.
- Order From Vendor - When this field is selected, the
item is ordered from a vendor. The PO for the item originates at the organization
and asset location in which the item is being created. If the box is not checked,
the item is replenished via system transfer from the organization and asset
location specified in Replenish From Organization
and Replenish From Asset Location.
- Replenish From Organization
- If another organization is responsible for replenishing the stock of the
item, the organization is listed in this field. This situation occurs in multi-organizational
environments. See Processing Items Across
Organizations.
Replenish From Asset Location
- If the asset location for the item you are adding is replenished from another
asset location, select the replenishing asset location from the prompt.
- Optimum Percentage Increase - The percentage of the
Minimum Stock Quantity or Safety
Stock Quantity (whichever is greater) at which you wish to maintain the
optimum stock quantity. The system multiplies the optimum percent by minimum
stock quantity to calculate the optimum stock quantity. Optimum percentage
at the item level overrides the optimum percentage at the asset level.
The Optional Panel
The fields on the Optional panel allow you to enter more categories
and descriptors for the item that may be useful. Figure 10 shows the Optional panel.
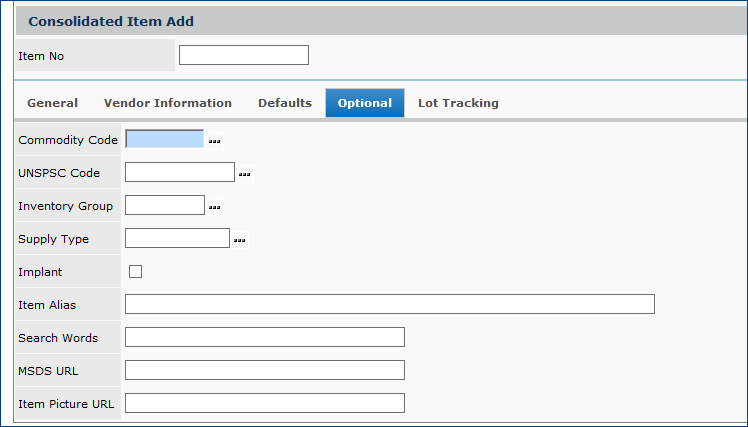
Figure 10 - Consolidated Item Add Optional Panel
- Commodity Code - A code that may be required and specified
by local regulations to track certain types of commodities. It is a high-level
classification of items into different groups for reporting. Examples: IV
Solutions, Radioactive Materials. Commodity codes are user defined.
- UNSPSC Code - The United Nations Standard Products and Services Code® (UNSPSC®) assigned to the item, if UNSPSC codes are used at your site. See Using UNSPSC Codes.
- Inventory Group - Another high-level classification
of goods within an asset location that you can define if needed. You can use this field to set up cycle counts that run more often than counts on ungrouped items, for example.
- Supply Type - Contains a site-defined supply type from the Supply Type table. Your site may define different categories of supplies in the table, and associate them with items in the item catalog.
Select a Supply Type, if you are using this field.
- Note: The item inventory record defaults to the Supply Type (for active items) setting from the item catalog. You can edit the item inventory record to override the default Supply Type value.
- Implant - When selected, the item is an implant (e.g., pacemaker).
- Note: The item inventory record defaults to the ImplantYN settings from the item catalog when creating an item.
- Item Alias - An alternate description or name for the
item. The Item Alias is extremely useful when a user does not know the Item Number or Description.
Example: "chucks," "peachy keens," and "blue bed pad" are all Item Aliases
for the same item. This field is searched when you use the Search panel and enter the alias into the Search Words field. You can enter an Item Alias that has up to 100 characters.
Item aliases can also be entered on the Item Inventory panel. An item alias for an inventory record can be the same as the item catalog alias, or different. The system applies these rules of precedence:
-
The item alias on the item inventory record takes precedence over an alias for the item in the item catalog.
-
If the item inventory record has no item alias, then the item alias on the item catalog record is used.
-
If the item catalog has no item alias, then the item’s description is used.
Rules of precedence apply in areas where the system uses item records.
- Search Words - Words that users may associate with the
item to make searching easier. For example, for gauze pads, you might enter
"gauze," "dressings," "pad," and so on. This field is searched when you use the Search panel and enter the alias into the Search Words field. See the discussion of the Item Alias for information on changing Search words.
- Adding/Changing Item Aliases and Search Words
- When you enter an Item Alias or Search words in an item catalog record for the first time, the system automatically enters the item alias and search words in all inventory records for the item that are missing an Item Alias or Search words.
To enter a new Item Alias or new Search words:
On the item catalog record, enter the item alias or search words in an empty Item Alias field or a Search words field. The system then uses the item catalog values to populate any inventory records that are missing the item alias or search words.
To change an Item Alias or Search words:
- To change an Item Alias or Search words in the item catalog only, enter new values in the fields.
- To change an Item Alias or Search words in the item catalog and in item inventory records,
- Empty the current Item Alias or Search words fields in the inventory record(s).
- Then, enter the changed item alias or search words in the item catalog record.
- The new values will populate the emptied Item Alias or Search words fields in the item's inventory records.
- Important: Changes from the item catalog do not get copied to item inventory records unless you first empty the Item Alias and Search words fields in the inventory records.
- MSDS URL - MSDS stands
for Material Safety Data Sheet. The MSDS URL is the Internet location of the
sheet. If you have checked Hazardous Materials under the Defaults
tab, then you should enter information in the MSDS URL field.
- Item Picture URL - The Internet location (URL) of a
picture of the item.
If you enter the address of the item image,
the application will build a link from the item number in the Item Catalog and Item Inventory lists to the web page that contains the item picture.
Users will be
able to click the link to view the picture.
Be sure to use the address of the actual picture with the image identifier containing ".jpg" or ".png."
If you just use the supplier's page URL, you will not get the picture to load into ERP.
How To:
- Locate the image on the supplier's web page.
- Put your mouse on the image, and right click for a menu.
- Select Copy image address
The clipboard for your browser will capture the image file's
address.
- Return to the ERP Item Catalog edit page for the item.
- Right click and paste the image address into this field (Item Picture URL).
Be sure to Save the edited item record.
The image will be available from both the Item Catalog and Item Inventory records for the item.
The Lot Tracking Panel
The settings for fields on this panel instruct Supply Chain to track the lot number,
serial number, and/or expiration date from the time the item is entered into
inventory until the item is issued.
When you select the lot tracking field,
then you specify the kind of tracking you wish (lot number, serial number, expiration
date, combinations, or all three). You can associate patient, physician, and
case data with an item's lot number and serial number.
Lot tracking must be
enabled for an asset location in order to be enabled for any items in the asset
location.
- Tracking Enabled - When selected, Supply Chain tracks lot
numbers, expiration dates, and/or serial numbers.
- Lot Number Tracking - When selected, lot numbers for
the item are tracked.
- Expiration Date Tracking - When selected, expiration
dates for the item are tracked.
- Serial Number Tracking - When selected, serial numbers
for the item are tracked.
Definitions
You may wish to review a few definitions
as used in ERP Materials Management:
- Asset Location - An asset location is a collection of item records that contain item vendor details, manufacturer information, contracts that govern the items, prices, statistics, and more. Asset locations are key to processing in Supply Chain, whether the hospital uses a stockless method, or maintains a on-hand supplies.
An asset location may be virtual, or associated with an actual physical storeroom. In Supply Chain, departments' requests for items (which may generate purchase orders) and request fulfillment take place through asset locations.
If a medical center has several asset locations, a default asset
location is assigned to each department, although departments may be able
to request items from other asset locations as well. In a large medical center,
a small number of asset locations may supply all the other asset locations.
- Item Catalog - A list of items that
a medical center normally uses. The items
may be stock (commonly used or kept on-site in an asset location) or non-stock (available for order). Items that are not cataloged
are non-file items. Non-file items are usually uncommon, or meet the
unique needs of a department or staff member. Stock and non-stock items for
a site are listed in the item catalog. You can view the catalog by
selecting Inventory > Item Catalog from the Materials Management main Contents.
- Direct Delivery - An agreement
with a vendor in which the vendor delivers ordered items directly to the department
that will use them, bypassing the receiving dock. A department may identify
one or more delivery locations to Supply Chain, and the delivery location can
be specified on purchase orders.
- EDI - Electronic Data Interchange.
A method of electronically exchanging information (such as purchase orders,
vendor catalogs, shipping notices, etc.) between a supplier and a purchaser. The EDI standards specify formats for the various types of documents.
- Inactive - A designation for items that are currently not
used. Inactive items can be reactivated.
- Incomplete status of an item - Critical Information on
the item record such as vendor, unit of measure, and price is missing. The item cannot be requested or ordered until its record has been completed.
- Issue - To give out or distribute
supplies. The issuing function is associated with asset locations.
- Multi-Organizational Environment
- A hierarchical structure with multiple top-level, semi-autonomous units;
for example, a large medical center with a general hospital and one or more
additional hospitals or specialty units such as a cancer center, clinics, or a women's pavilion. Other examples are a medical center with inpatient and outpatient units (e.g., a day-surgery
center). Many different configurations are possible, but the key is having
two or more top-level, functional organizations containing departments, or
smaller divisions.
- Non-File Item - An item that
is not in a site's item catalog/item file. Non-file items are typically special request items.
- Non-Stock Item - An item
that is commonly used by a medical center, and exists in the item catalog, but
is not kept on site, and must be ordered from a vendor when requested by a
department. Asset locations maintain records for non-stock (as well as stock) items.
- Stock Item - An
item that is normally kept in inventory; or, for a hospital that does not maintain inventories, an item that is used and ordered continuously. Stock item records are in asset locations.
- Stockless Environment
- A medical center that does not maintain a physical inventory of stock items. Items are always ordered from vendors and may be delivered directly to
departments.
Copyright © 2023 by Premier Inc. All rights reserved.