Perform a Physical Inventory Version
Contents
Overview
Taking inventory of items in an asset location involves several decisions and
steps. You can select items for counting in different ways. You
can specify items for the count sheet individually by Item Number and
Description. Or, you can specify items by category such as class,
commodity code, inventory group, ABC class, and
aisle and bin location
During
a physical inventory, items that are being counted may not be available for
certain functions. For example, on-hand quantity cannot be adjusted, nor can
the items in the count be placed on a pick list for delivery to a department.
Receipts and credit POs for the items cannot be created. Backorder processing
for items being counted is suspended.
The Status of a physical inventory indicates if it is "In Progress."
A physical inventory in progress can be canceled at any time.
The system provides printed reports to assist with item count and reconciliation,
automatically adjusts quantities when the inventory is complete, and posts quantity
differences to the General Ledger.
Mobile Applications on the iPad
If you are an iPad user, documentation for inventory counts is available from the Quick Start Guide on the iPad.
Security
The role object that controls access to physical inventory is "Physical," minimally set to View.
To execute the physical inventory and enter counts, the role object "Physical" must be set to Create.
To access organization, department, or asset location data, the organization, department, or asset location must be included in a user's data profile.
General Steps in a
Physical Inventory
The general
steps in performing an inventory are:
- Select the items that you want to count.
- Run a count sheet for the
items.
- Count the items
manually and enter the count.
Or use the iPad mobile ERP application.
- Run the Interim Comparison
Report.
- Review the Interim Comparison Report.
Recount items as needed to reconcile differences between the on-hand
quantity and the quantity actually counted.
- Run another interim comparison report, if needed.
You might have to perform steps 4, 5, and 6 several times until you are comfortable
that the manual count is as accurate as possible.
- Final Adjustment update.
- Final Adjustment
Report.
Identifying Items
to Count
Two methods exist for identifying items to be counted and building an inventory
list:
- Identify items by "selection,"
i.e., items of a certain class, items from a particular aisle or bin, items
in a specific inventory group, etc.
The system finds items meeting your selection criteria.
- Select items by "item
list." You identify the individual items to be counted, and the system
makes a list.
The Select Via field specifies which method you are using for the count.
The values that you can choose are:
- Selection - The system prints count sheets
for items meeting the To and From
criteria, as described below.
- Item List - All other selection criteria are ignored, and
the system creates a custom count list made of items that you identify.
An item can occur on multiple physical inventories, but can only be on one
physical inventory whose status is "In Progress."
To
set up an inventory count sheet by item category:
-
From the Materials Management main Contents, select Warehousing > Physical Inventory.
The Physical Inventory jobs list appears, or No Data if no physical
inventory jobs exist.
-
Click New. The Physical Inventory set up panel appears (Figure 1).

Figure 1 - Set Up a Physical Inventory Edit Panel
- Enter information in the header fields and in the General
tab fields as follows:
- On the header, enter a Physical Inventory code and a Description.
These fields are required.
- If the Blind
field is checked, then the On Hand Quantity field on both the iPad and count sheets is set to 0.
- If this field is not checked, then the On Hand Quantity field is set to the
value in the item inventory record.
- Select a value for Count Sheet Sort. Count Sheet Sort tells
the system how to sort the printed sheet that you use for the physical count.
- For Select Via, choose Selection. Selection means
that you will identify items by category.
- For Selected Item Type, the choices are:
- All - All active stock items, consignment items, and non-stock
items with on-hand quantity will print on count sheets.
- This choice is the most accurate for inventory valuation. All is
the default.
- Stock - All active stock items print on the count sheet.
- Non Stock - Only non-stock items with on-hand quantity will print.
- Consignment - Only consignment items will print on the count sheet.
- To identify items by ABC Class, click
the arrow next to Selected ABC Class and select the class.
- You can also choose No Selection or No Class.
- To count items in a range of sequential item classes,
select the first class from the prompt (...) in From Item Class.
- Select the second class from the prompt (...) in To Item Class.
- You can use the Item Class category alone, or in combination with
the other categories.
- You can also specify the From /To Item SubClass.
- To count items by commodity code, click
the prompt (...)
next to Selected Commodity Code.
- Choose the commodity code from the list that appears. Selected Commodity
Code can be used with the other categories.
- To count items by inventory group,
click the prompt next to Selected Inventory Group.
- Choose the inventory group code from the drop list. Selected Inventory
Group can be used with the other categories.
- To count items in a particular Primary Aisle or
Bin, enter the aisle/bin code in the field From Primary Aisle
or From Primary Bin.
- For a range of sequential aisles/ bins, enter the starting aisle/bin code
in the field From Primary Aisle or From Primary Bin.
- Enter the ending aisle/bin code in the field To Primary Aisle or To
Primary Bin.
- To count items in a particular Alternate Aisle
or Bin, enter the aisle/bin code in the field From Alternate
Aisle or From Alternate Bin.
- Use the From... and To... fields to specify a range. Primary/alternate aisle and
bin can be used with other categories.
- To count items with a particular UNSPSC code, enter the UNSPSC code in the field From UNSPSC Code.
- Use the From and To fields to specify a range. UNSPSC codes can be used with other categories.
- Click Submit. If there are no errors, the system returns you to the
list of physical inventory jobs.
- Click Refresh. The count sheet appears.
To
set up an inventory count sheet by specifying items:
- From the Materials Management main Contents, click Warehousing > Physical Inventory.
- The Physical Inventory Jobs list appears.
- Click New. The Physical Inventory panel appears (Figure
1).
- Enter information in the fields on the General tab as follows:
- On the header, enter a Physical Inventory code and a Description.
These fields are required.
- Click the arrow next to Count Sheet Sort and select a value.
- Count Sheet Sort tells the system how to sort the printed sheet that you
use for the physical count.
- For Select Via, choose Item List.
- Item List means that you will identify specific, individual items
for the count. Figure 2 is an example.
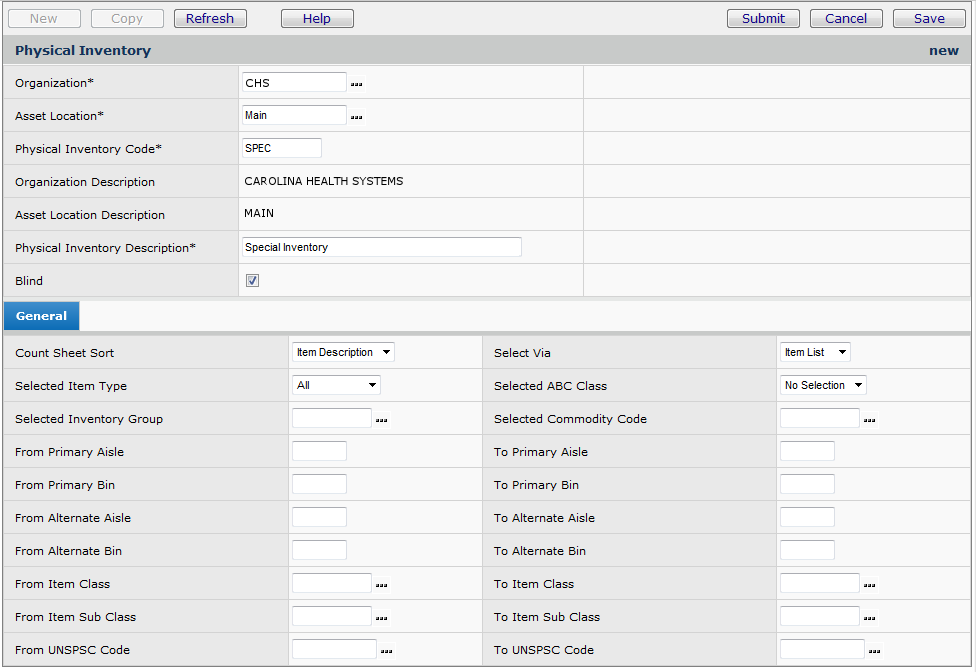
Figure 2 - Setting Up a Physical Inventory By Item
- Click Submit. The Physical Inventory jobs list appears.
- Click Refresh. The name of the physical inventory that you just
set up appears.
- Next to the inventory name, click Menu > Items to Inventory.
- The Select Physical Inventory Items list appears. The panel shows
the No Data message.
- Click New. The Select Physical Inventory Item panel appears (Figure
3).
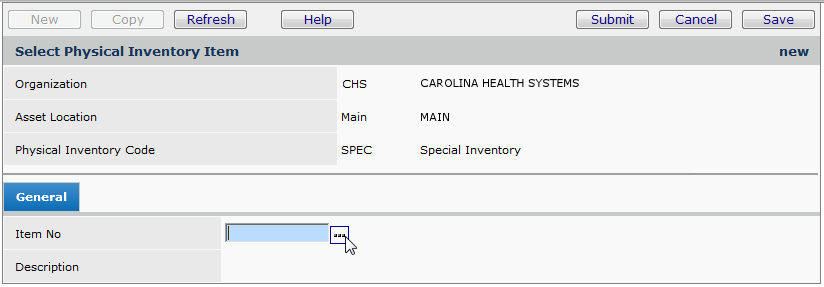
Figure 3 - Selecting an Item for a Physical Inventory
- Click the prompt(...) next to Item No and select an
item to count.
- Click Save.
- Click Submit
- The Item List for the count appears.
- Click Refresh to view the items you add
to the list.
- Continue using steps 7 through 10 identifying the items that you want on
the count sheet.
- When the list is complete, click Back.
- The Physical Inventory jobs list appears.
To execute an inventory and
print a count sheet:
- From the Materials Management main Contents, select Warehousing > Physical Inventory.
The Physical Inventory jobs list appears.
- Locate the physical inventory job that you wish to run.
- Click Menu > Execute Physical Inventory.
- You are asked to confirm that you want to start the inventory.
- Click Submit.
- A message "Execute Pending" appears in the list next to the name
of the inventory.
- (Other messages may appear that update the status of the inventory job.
You can click on any of the messages to get details.)
- Wait for the inventory job to finish executing.
- When it has finished, proceed to the next step below.
- If you are going to manually count the items, click Menu > Print/Reprint
Count Sheets.
- A message appears telling you that your count sheet has been submitted for
processing.
- To print your count sheet, from the Materials Management main Contents, select Reports
> My Archived Reports.
Your work sheet appears in the list of other reports that you have run.
- Click View Report.
- Click the Print icon or select File > Print from the
report view.
- Later in the inventory process, you can reprint the count sheets if you
need to.
-
If you are using a iPad to count items, follow the instructions
in the Quick Start guide on the ERP Mobile Application's opening screen.
To
manually record the physical item count:
- From the Materials Management main Contents, select Warehousing > Physical
Inventory.
- The Physical Inventory jobs list appears.
- Locate the physical inventory job that you wish to use.
- Click Menu > Enter Counts. The Physical Inventory Count Entry panel appears.
- Enter the count for each item in the Inventoried Quantity field.
- You can enter counts of items for the item's default issue UOM,
and/or default purchase order UOM. You can enter counts in the item's lowest UOM only when the lowest UOM is a purchase UOM and/or an issue UOM.
Note: The printed count report shows N/A in the lowest UOM field if the lowest UOM is not available for entering counts.
- Click Save periodically as you work.
- When you are finished entering the counts, click Submit.
- The Physical Inventory jobs list appears. The date when you finished the inventory will be listed under Last Update Date for future reference.
To run an Interim Comparison
Report:
- From the Materials Management main Contents, select Warehousing > Physical Inventory.
The Physical Inventory jobs list appears.
- Locate the physical inventory for the Interim Comparison Report.
- Click Menu > Interim Comparison Report.*
A message asks if you want to run the report.
- Click Submit.
A message appears telling you that your report has been submitted for processing.
You can view and print your report from My Archived Reports.
*To output an Interim Comparison Report to an Excel spreadsheet, select Interim Comparison Report - Excel from the menu.
**This report can also be generated from the report object "Physical Inventory Reconciliation Report" found in the Report Dictionary.
To run a final adjustment update:
- From the Materials Management main Contents, select Warehousing > Physical Inventory.
The Physical Inventory jobs list appears.
- Locate the physical inventory that you wish to complete. Click Menu
> Final Adjustment Update.
A message asks if you want to make final adjustments to the inventory.
- Click Submit. A message appears.
The status of the physical inventory job changes to Final Physical Inventory
Pending.
Behind the scenes, the Submit step does the following:
- Sets the on-hand quantity for the items selected to the counts you entered.
- To view the adjusted on-hand quantity for the items, from the Materials Management main Contents, click Inventory > Item Inventory
(or Item Inventory - All Locations).
- Removes the physical inventory hold flag so that transactions can be written
against the items.
- Posts the last inventory date and amount to the Item Stock Status tab.
- Posts General Ledger transactions to the Asset Location Account and the
Inventory Adjustment Account.
To
run a Final Adjustment Report:
- From the Materials Management main Contents, select Warehousing > Physical Inventory.
The Physical Inventory jobs list appears.
- Locate the physical inventory for the final adjustment.
- Click Menu > Final Adjustment Report.
A message asks if you want to run the report.
- Click Submit.
- A message appears telling you that your report has been submitted for
processing.
The report will include your new inventory value.
You can view and print your report from My
Archived Reports.
To cancel a physical inventory:
- From the Materials Management main Contents, select Warehousing > Physical Inventory.
The Physical Inventory jobs list appears.
- Locate the physical inventory job that you wish to cancel.
- Click Menu > Cancel Physical Inventory.
A message asks if you want cancel the physical inventory job.
- Click Submit.
- The Status of the physical inventory job has is Canceled.
Copyright © 2023 by Premier Inc. All rights reserved.