What's New in Release 7.10
|
||||||||||||||||||||||||||||||||||||||||||||||||||||||||||||||||||||||||||||||||||||||||||||||||||||||||||||||||||||||||||||||||||||||||||||||||||||||||||||||||||||||||||||||||||||||||||||||||||||||||||||||||||||||||||||||||||||||||||||||||||||||||||||||||||||||||||||||||||||||||||||||||||||||||||||||||||||||||||||||||||||||||||||||||||||||||||||||||||||||||||||||||||||||||||||||||||||||||||||||||||||||||||||||||||||||||||||||||||||||||||||||||||||||||||||||||||||||||||||||||||||||||||||||||||||||||||||||||||||||||||||||||||||||||||||||||||||||||||||||||||||||||||||||||||||||||||||||||||||||||||||||||||||||||||||||||||||||||||||||||||||||||||||||||||||||||||||||||||||||||||||||||||||||||||||||||||||||||||||||||||||
|
New Features and Enhancements - Release 7.10A summary of enhancements made in updates since Release 7.9 is also included in this document. ERP Materials Management and Financials
Sourcing and Contract Management (SCM)
ReportsERP Materials Management and Financials Enhancements
|
| VENDOREXT | CustomerID | Time Stamp | ||||
| Column Name | Max Character Length | Max Numeric Length | Decimal Positions | Required | Notes | Used With |
| RecordType | 1 | Yes | 1=Vendor, 2=AP Loc |
All | ||
| ActionCode | 1 | Yes | All | |||
| VendorNumber | 15 | Yes | ||||
| ExtAPVendorNo | 15 | Yes | All | |||
| VendorType | 1 | No | 1=MM, 2=AP, 3=MM/AP Used for Vendor Adds only |
1,4,5,6 | ||
| VendorName | 50 | No | 1,4,5,6 | |||
| VendorID | 15 | No | 1,4,5,6 | |||
| BuyFromLoc | 15 | No | 1=Yes, 0=No Set to zero (0) if not entered |
3,4,6,7,8 | ||
| APLocation | 15 | No | 2,5,6 | |||
| AddressName | 50 | No | 2,3,4,5,6 | |||
| AddressLine1 | 50 | No | 2,3,4,5,6 | |||
| AddressLine2 | 50 | No | 2,3,4,5,6 | |||
| AddressLine3 | 50 | No | 2,3,4,5,6 | |||
| City | 30 | No | 2,3,4,5,6 | |||
| StateCountry | 2 | No | 2,3,4,5,6 | |||
| Country | 30 | No | 2,3,4,5,6 | |||
| ZipCode | 10 | No | 2,3,4,5,6 | |||
| TaxID | 15 | No | 1,4,5,6 | |||
| Code1099 | 10 | No | 1,4,5,6 | |||
| CustSvcContact | 50 | No | 1=Yes, 0=No Set to zero (0) if not entered. Determines whether the Order Qty should be adjusted based on previous activity. |
2,3,4,5,6 | ||
| ContactTelNo | 30 | No | 2,3,4,5,6 | |||
| FaxNumber | 30 | No | 2,3,4,5,6 | |||
| ContactEmailAddress | 30 | No | 3,4,6 | |||
| DefaultBFLYN | 1 | 0 | Yes | 1=Yes, 0=No Set to zero (0) if not entered Sets BuyFromLoc as Vendor default (MM, MM/AP) |
1,4,5,6 | |
| DftInvoicingExtAPVendor | 15 | No | 1,4,5,6 | |||
| DftInvoicingAPLoc | 15 | No | 1,4,5,6 | |||
| PaymentTerms | 10 | No | 1,4,5,6 | |||
| PaymentMethod | 10 | No | 2,5,6 | |||
| Bank | 15 | No | 2,5,6 | |||
| BankAccount | 15 | No | 2,5,6 | |||
| BankAccountRouting | 15 | 2,5,6 | ||||
| DiscountTerms | 10 | 1,4,5,6 | ||||
| DefaultAPLYN | 1 | 0 | Yes | 1=Yes, 0=No Set to zero (0) if not entered Sets AP Loc as Vendor default (AP only) |
1,4,5,6 | |
| DeleteSuspend | 1 | No | 1,4,5,6 | |||
| VendorGroup | 15 | No | 1,4,5,6 | |||
| PaymentPriority | 15 | No | 1,4,5,6 | |||
| POTransmitType | 15 | No | 3,4,6 | |||
| MinOrderAmt | 19 | 4 | No | 3,4,6 | ||
| DftFreightType | 15 | No | 3,4,6 | |||
| VendorOrderCycleCode | 10 | No | 3,4,6 | |||
| SeparatePOByDeptYN | 1 | 0 | No | 3,4,6 | ||
| SepPOByItemTypeYN | 1 | 0 | No | 3,4,6 | ||
| AutoAuthEDIPOYN | 1 | 0 | No | 3,4,6 | ||
| AutoAuthFaxPOYN | 1 | 0 | No | 3,4,6 | ||
| AutoAuthEmailPOYN | 1 | 0 | No | 3,4,6 | ||
| FillKillYN | 1 | 0 | No | 3,4,6 | ||
| AutoProcessASNYN | 1 | 0 | No | 3,4,6 | ||
| Org | 15 | Yes | 7,8 | |||
| AssetLoc | 15 | Yes | 7 | |||
| Dept | 15 | Yes | 8 | |||
| DeliverToLoc | 15 | Yes | 8 | |||
| HospitalAcctNo | 15 | Yes | 7,8 | |||
| DftPayingAPLoc | 15 | No | 2,5,6 | |||
| DftPayingVendor | 15 | No | 2,5,6 | |||
| EmailAddress | 30 | No | 2,5,6 | |||
| TaxGroup | 10 | No | 2,5,6 | |||
| TaxType | 10 | No | 2,5,6 | |||
| DirDlvYN | 1 | 0 | No | 3,4,6 | ||
| FreightLimit | 19 | 4 | No | 3,4,6 | ||
| RGARequiredYN | 1 | 0 | No | 3,4,6 | ||
| TaxIDType | 10 | No | 1,4,5,6 | |||
| LegalNameFor1099 | 50 | No | 1,4,5,6 | |||
| AddressLine1For1099 | 50 | No | 1,4,5,6 | |||
| AddressLine2For1099 | 50 | No | 1,4,5,6 | |||
| AddressLine3For1099 | 50 | No | 1,4,5,6 | |||
| APLocationFor1099 | 30 | No | 1,4,5,6 | |||
| CityFor1099 | 2 | No | 1,4,5,6 | |||
| StateCountryFor1099 | 30 | No | 1,4,5,6 | |||
| ZipCodeFor1099 | 10 | No | 1,4,5,6 | |||
| CountryFor1099 | 30 | No | 1,4,5,6 | |||
| AutoMatchEDIYN | 1 | 0 | No | 1,4,5,6 | ||
| DftDistProfile | 15 | No | 1,4,5,6 | |||
| FinRptFld1 | 10 | No | 1,4,5,6 | |||
| FinRptFld2 | 10 | No | 1,4,5,6 | |||
| FinRptFld3 | 10 | No | 1,4,5,6 | |||
| ProjectCode | 10 | No | 1,4,5,6 | |||
| FundCode | 10 | No | 1,4,5,6 | |||
| GLAcctDftDistP1 | 15 | No | 1,4,5,6 | |||
| GLAcctDftDistP2 | 10 | No | 1,4,5,6 | |||
| GLAcctDftDistP3 | 10 | No | 1,4,5,6 | |||
| SepPmtPerInvYN | 1 | 0 | No | 1,4,5,6 | ||
| InComplianceYN | 1 | 0 | No | 1,4,5,6 | ||
| SmallBusinessYN | 1 | 0 | No | 1,4,5,6 | ||
| FemaleOwnedYN | 1 | 0 | No | 1,4,5,6 | ||
| LocallyOwnedYN | 1 | 0 | No | 1,4,5,6 | ||
| MinCertifiedFromDate | 10 | No | 1,4,5,6 | |||
| MinCertifiedNo | 15 | No | 1,4,5,6 | |||
| MinCertifiedToDate | 10 | No | 1,4,5,6 | |||
| MinorityCertifiedYN | 1 | 0 | No | 1,4,5,6 | ||
| MinorityVendorYN | 1 | 0 | No | 1,4,5,6 | ||
| PreferredStatusYN | 1 | 0 | No | 1,4,5,6 | ||
| RestrictedVendorYN | 1 | 0 | No | 1,4,5,6 | ||
| BTGLNCode | 13 | 0 | No | 1,4,5,6 | ||
| STGLNCode | 13 | 0 | No | 1,4,5,6 |
Importing Vendor Records
The vendor import is available from the Materials Management or AP main contents:
Materials Management > Imports/Exports and Financials > Vendor Import
AP > Imports/Exports > Vendor Import
Importing vendor data is described in detail in the online documentation topic "Import Vendor Data."
 Documents attached to journal vouchers can now be accessed from the journal vouchers list.
Users need to be able to review documents associated with a journal voucher from the Journal Vouchers list. This feature is implemented in this release: a column Documents has been added to the Journal Vouchers list. (Figure 1). The column displays the document name, with an arrow.

The Documents Column on the Journal Voucher List
General Ledger main Contents > Journal Vouchers > Journal Vouchers
• If a single document is available , the document name and arrow ![]() are visible. Clicking the
are visible. Clicking the ![]() opens the document for viewing.
opens the document for viewing.
• If multiple documents are available, the most recent document that was uploaded appears, followed by the word "Multiple." Clicking the arrow opens the document.
Several list panels no longer default to the user's Current Organization, but display data for all organizations.
Defaulting to the Current Organization for data display in several list panels has been changed. In this release, several list panels no longer default to the user's Current Organization. Instead, ERP displays data for all organizations permitted by the user's Data Profile.
- On the lists, the Quick Filter for Organization is initially blank.
- The Quick Filter and Position to tools let you specify an organization of interest, if you do not wish to view all organizations.
The Show All link may still appear if there are other columns that are prefiltered, by default. (For example, the invoices list is prefiltered to show only "non-deleted" invoices.)
Figure 2 is an example of a list with the change.
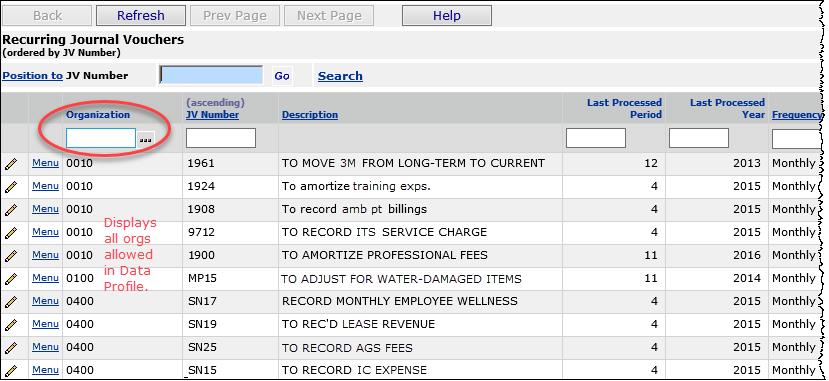
Sample of a List Panel with New Default to "All Organizations"
Table 1 contains the locations of the changed lists:
Table 2
Location of Lists that Display Data for All Organizations in the User's Data Profile, by Default.
|
|
New manufacturer GTIN identifier types -- HIBC and ISBT -- are available.
Users have needed these GTIN identifier types to complete records for manufacturers who use GTIN IDs. These identifier types can be entered manually on a manufacturer record (Figure 3) and also appear on the GTIN export file. Up to 80 characters are allowed for these identifier types in the Identifier Number field/column. Three report objects reference the new ID: "Manufacturer Item Identifiers", "Manufacturer Item Identifiers (GTIN) Discrepancies", and "Item Vendor UOM".
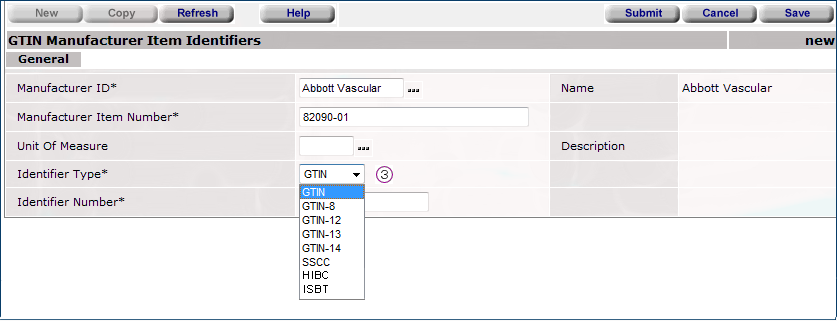
New GTIN Identifier Types (HIBC, ISBT) Available on the Edit Panel for Selection
Payments made in an external system can be imported into ERP for viewing, avoiding the need to access the external system separately for payment information.
Accounts payable staff using ERP need to see invoices and payments that reside in an external system (such as Oracle and others). Normally, this task would require staff to access the external application to display payments. This feature lets you import payments into ERP for viewing, and avoids having to open the external payment application for the information.
A .csv file template is available for the payment imports. You can send the template to the external application's IT staff. Once the .csv file containing external payments is in a location on your network, you can upload the file, and import it into ERP. Payments made in the external system and invoice statuses are then available for inquiry in ERP. The import is the standard ERP import.
Note: Sites that export invoices to an external system for payment have the System Value Export Invoices to External System set to "on."
(Figure 4).
Security: Users who import payments must have the role object "Payment Import" set appropriately. The default setting is None.

Setting a System Value to Export Invoices to an External Payment System
Administration > System Values > edit > Other
Payment upload file format and fields
Figure 5 contains the format and fields for the .csv payment upload file. You must save the file as a .csv. The last line of the file must contain EOF, by itself.

Fields for the Payment Import .csv Upload File
Figure 6 is an example of a payment import file containing data. (Note: the data are displayed in Excel, but the file must be a .csv file.)

A Sample Payment Import File Displayed in Excel
Upload process
Payments from an external application are imported using the standard import process.
- From the Materials Management main Contents, open Imports/Exports and Financials > Payment Import.
You can also open the Payment Import list from Accounts Payable > Imports/Exports.
A list of imports appears, if any exist. Otherwise, No Data appears. - Click New. The Import Panel appears (Figure 7).

The Import Panel for Uploading a Spreadsheet of Payments
Materials Management main Contents (or GL) > Imports/Exports and Financials > Payment Import > New
- Enter the file that you wish to import in the File to Upload field.
- Click Browse to locate the file in your local network folder, then click the file to select it.
- At this step, you have a choice. You can work through the import process in two stages or in one stage.
If you have uploaded files to the application before, use the one-stage approach, as follows:
- Click Submit. The system attempts to upload your file and validate it. The Imports list appears.
- Click Refresh to see your file listed on the Payments Imports list.
- Click Submit. The system attempts to upload your file and validate it. The Imports list appears.
For new users of this feature, we recommend the two-stage import approach. The two-stage approach first loads the file and validates it.
Once the file has successfully loaded, you can process it manually to import it into the application.
Figure 8 is an example of the Payment Import list with several imported files. From the Menu, you can reprocess a file, open a file and view the import details, download a file to a network location, or delete a file.

Payment Imports List
Materials Management main Contents (or GL) > Imports/Exports and Financials > Payment Import
Invoice and Payment Inquiry
For invoices whose payments are imported from an external system, the Invoice Inquiry panel contains a new tab: Payment Imports. This tab displays data from the import (Figure 9).

Inquiring on an Imported Payment for an Invoice
Materials Management main Contents > Invoicing > Invoices > i
From the menu, you can review payments for the invoice lines (Figure 10). Notice in Figure 10 under Pay Action that one payment with check 124 was subsequently voided.
For PayAction P, invoice will have the Status of "Complete" or "Part Paid."
For PayAction V, invoice will have the Status of "Paid In Full" or "Part Paid."

Details of Inquiry on an Invoice with Imported Payment Information
Materials Management main Contents > Invoicing > Invoices > i >
You can display further details (Figure 11) by clicking View Import Details.

Drill Down on Inquiry Details for an Imported Payment
Materials Management main Contents > Invoicing > Invoices > i > Payments tab > View Import Details
Uploading vendor quotes to create requisitions
A new import feature uploads line items from vendor quotes. When an imported quote is processed, ERP generates a requisition. This feature avoids having to retype each line to create a requisition. Typically, this process would be initiated by Remitra (aka IDS), similar to the way EDI invoices are handled by Remitra and processed into ERP. A copy of the quote document is then attached to the requisition.
You can also upload paper quotes manually to create requisitions (however, the quote document is not attached, in this case). Manual upload uses the standard ERP import process. Instructions for the manual upload are below.
To use this feature, contact the Help desk.
- For Remitra processing, setup steps are needed.
- For manual uploads, the feature must be enabled for your site. The menu option for Quote Imports (under Materials Management > Requisitioning) is not visible unless the feature is enabled.
Security: Manual upload of vendor quotes is controlled by the role object "QuoteImports." The default setting is None. Users accessing this feature must have the minimum setting of Modify.
Manual quote upload file format and fields
A .csv file template is available for quote imports. You can send the template to the vendor for completion, or complete it yourself. Save the file to your local network. Once the .csv file containing the quote information is in a location on your network, you can upload the file, and import it into ERP. The import is the standard ERP import.
Vendor quote upload file and fields for manual upload
Figure 12 contains the fields for the .csv quote file. The top seven columns are for the header. The columns underneath the top seven are the lines in the quote. Note that the header must contain the value H in the first column. Each line must contain the value D in the first column.
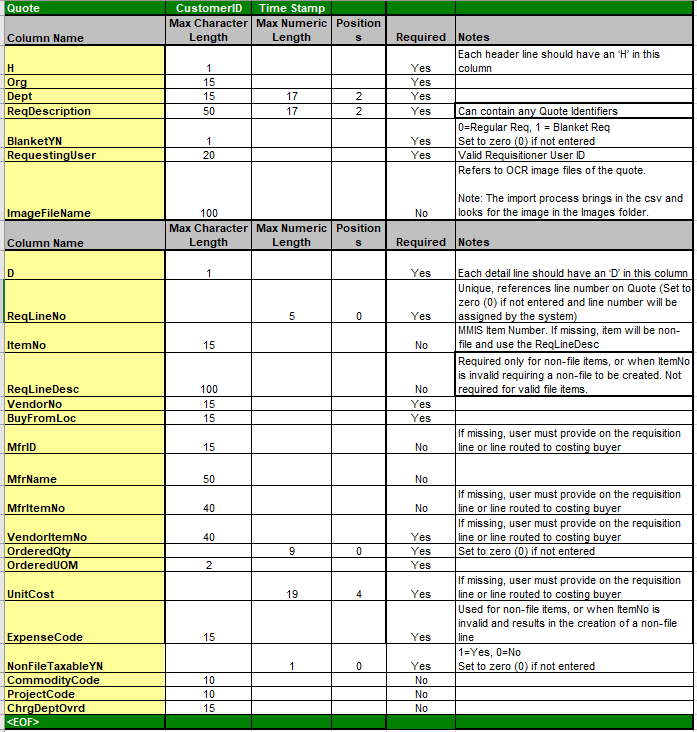
Data Fields for Importing Quotes in a .csv File
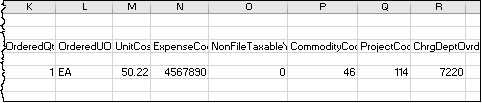
Figure 13 is an example of a quote import file displayed in Excel.
 |
|
Sample Quote Import in Excel
Import Process
Vendor quotes are imported using the standard import process. Here is a quick review of the standard import process.
- From the Materials Management main Contents, open Requisitioning > Quote Import.
A list of import appears, if any exist. Otherwise, No Data appears. - Click New. The Import Panel appears (Figure 14).
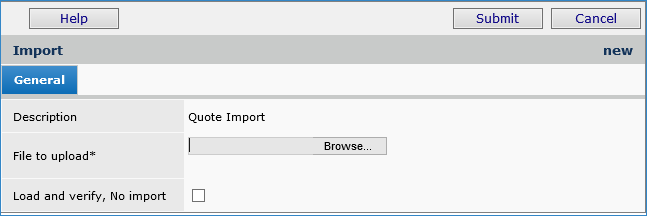
Quote Import Panel
Materials Management main Contents > Requisitioning > Quote Imports
- Enter the file that you wish to import in the File to Upload field. The file must be a .csv file.
- Click Browse to locate the file in your local network folder, then click the file to select it.
- At this step, you have a choice. You can work through the import process in two stages or in one stage.
If you have uploaded files to the application before, use the one-stage approach, as follows:
- Click Submit. The system attempts to upload your file and validate it. The Imports list appears.
- Click Refresh to see your file listed on the Quote Imports list.
- Click Submit. The system attempts to upload your file and validate it. The Imports list appears.
Resulting Requisitions
On the requisitions list (Materials Management > Requisitioning > Requisitions - Current Department or All Depts) you can display and review requisitions created by the quote import process. Requisitions created by the process contain Yes in the new Quote field (at the end of the row). Once created, a requisition generated from a quote import follows the usual process for approvals, if required.
ERP Problem Resolutions
- In some approval configurations, a requisition can get stuck in "Pending Approval" status, with users then unable to move the requisition forward. The problem was occurring when a requisition was auto-approved for one of the approvers in a Commodity Code group. The same user belonged to a second approval group, and in that group, marked the requisition as "reviewed." The requisition was then stuck, and approvals could not resume. This problem has been resolved so that the requisition can move forward in the approval process as needed.
- Under some circumstances for EDI invoices, General transactions were out of balance, causing out-of-balance journal vouchers. One situation where this problem was occurring involved EDI invoices with at least one in-tolerance (IT) exception line and another line with an R exception. Changing the tolerance triggered a price (P) exception in the R exception line, which the user cleared. The system then incorrectly set the IT exception to P, and created only a single GL transaction written to the AP Liability account. An out-of-balance GL export resulted, and an out-of-balance journal voucher. This problem is resolved so that ERP no longer generates the second, incorrect exception and transactions are correct. The correct result of the actions is and invoice that is Approved with balanced GL transactions.
- Several problems related to changes in Release 7.9.0.1 have been corrected. Here are some problems that were resolved, among others:
- When trying to access the Quick Issue or Quick Credit panels, users received an error message that their Supplying Organization, Asset Location is invalid, when, in fact, it was valid.
- Users could not match PO invoices. Clicking Invoicing > Create PO from the invoice produced error messages, and did not open a panel for matching.
- A PO that should have been available for matching was apparently not available.
- The POs for Receiving List was not populating unless users clicked Show All.
- In matching a PO invoice, the wrong organization appeared on the distribution display.
- Attempting to authorize a PO displayed the main Welcome Page Table of Contents, instead of the authorization panel.
- Users could not see the non-file lines entry panel when creating a purchase order.
- When trying to receive a PO, the system displayed a pop-up message that the list was positioned beyond the data.
- Requisitions were not displaying the non-file tab when users changed the department on the requisition.
This list is not inclusive. Other problems were also resolved.
SCM Enhancements
The "expired contract" indicator Exp has been added to several SCM panels. Excel output reports now contain a Status column with the appropriate status (expired or active).
This enhancement will assist users in locating expired contracts, so that they can act on them, or ignore them, as needed.
Below are listed the panels that now contain the Exp indicator. This indicator designates an expired contract or item contract price. The Exp indicator also appears on the Excel output. On Excel output, the Contract Status column, to the right of the Name column, displays the value "Expired" or "Active" as appropriate. Figure 15 and Figure 16 are examples.
Supply Contracts panels with Exp indicator
- Items With Price Exceptions
- Items On Existing Contract
- Items With Rejected Prices
- Items With UOM Errors
- Work with Contract, Price Changes.
Additionally, the Contract Status column displays "Expired," when appropriate for a contract, on the Excel output for these panels:
- Supply Contract Workbench
- Supply Contract, Work with Contract Price Changes
- Supply Contract, Work with Contract Lines
- Services Contract Workbench.
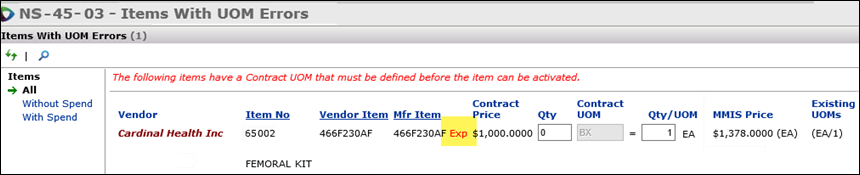
Exp Indicator Added to Items With UOM Errors Panel
SCM main Contents > Contract Workbench > open contract > Exceptions > Missing UOMs
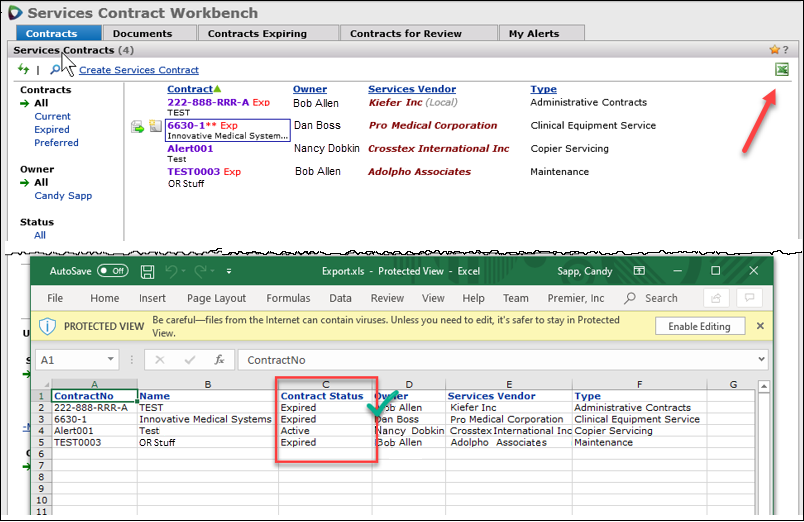
New Status Column for Excel Output - Services Contract Workbench
SCM main Contents > Shared Services > Contract Workbench > click Excel icon
SCM Problem Resolutions
- Users working with the Contract Price Change page could not successfully change the prices of some items. When the item number was entered by the user, the message "No contracts found with this item"' appeared. The problem has been resolved, and price changing works as designed.
- Previously, when you opened a graph/gauge in “Full View” mode, the Excel icon, normally in the upper right, is not available. The Excel icon has been restored, and export to Excel is now available..
- Contracts previously activated in SCA and designated as active in SCM were unexplainably showing in SCM as "not active."
This problem was traced to code that handled multiple entity activations, and has been resolved.
Reports
- Several changes have been made to the report objects "1099-MISC Form" and "1099-MISC Form Including Dropped Values."
The report objects have been renamed are "1099 Form" and "1099 Form Including Dropped Values." Here are the enhancements:
* Users can decide to include/exclude “N” values (NEC YNB)
* Code N values have been moved from box 7 to box 1, consistent with the new forms. - A new report object "Advr_qDeliveryReceiptShipTracking" is available.
Until this release, it took three separate reports to create the delivery information that users need: delivery confirmation, receipt, and shipment data. In this release, these three reports are consolidated to create one report.
Enhancements and Problem Fixes from Updates
The following changes to ERP and SCM were covered in previously released Notes for each hotfix or update.
- Update 7.9.0.4
ERP
- This update improves the way ERP handles EDI 855 contract item lines that have in-tolerance price changes.
Users need ERP to handle small price changes on these EDI lines. These changes can result from rounding; e.g., $1.6789 rounds to $1.68, for example. Previously, when an 855 price confirmation was processed for an item on a managed contract, and the PO Line was in-tolerance,
the price discrepancy was not being cleared automatically, as with other PO Lines.
- This enhancement flags these PO Lines as In-Tolerance (IT) and clears them automatically from the EDI 855 exceptions list.
- On parent managed contracts, the PO line’s Next Estimated Receipt Unit Cost is not changed, nor is the Item-Vendor UOM Price.
- Update 7.9.0.1
ERP
- A new PO liability maintenance utility is available.
This utility is designed to make PO liability reckoning easier. The tool uses the standard ERP import process to bring in amounts for PO liability and tax liability (if relevant) for a specified organization and purchase order.
A detailed description and procedure are in Appendix A.
- Changes in PO prices are now supported in ERP.
Users need to be able to change prices on authorized purchase orders when the Next Estimated Receipt Cost has a price change. This situation occurs when a vendor requires an updated copy of the PO with the price change displayed. Previously, users needed to copy the PO line and edit the price, and then delete the original line. With this enhancement, the copy of the PO that is sent to the vendor can contain the updated item price and total cost.
To change a PO price on an authorized PO:
- From the Materials Management main Contents, select Purchasing > Purchase Orders by PO or Purchase Orders by Create Date. The list of POs appears.
- Locate the PO of interest on the list.
- Next to the PO, click the edit icon. The PO opens for editing.
Note: You will not be able to edit a PO if receipts or invoices have been created or are open and incomplete. - At the bottom of the PO, click the Edit PO Lines tab.
- Locate the field Next Estimated Receipt Cost.
- Edit the field to enter the new price.
- Click Submit to save the change
- To print the PO with the price change, on the PO List, next to the PO, click Print PO.
The purchase order appears with the changed unit price and updated total. This change only appears on the printed/fax version, and not on the application’s display of the PO when you select it from the PO list.
SCM
- Charts (such as those on the ERP Welcome page) and SCM dashboards/gauges are now available and can be displayed in the application.
Note: When dashboards/gauges are enabled, the browser will use tabs by default. The IE Use Tabs selector is gone. New windows will open in a new tab.
A few elements of dashboards/gauges have temporary changes, which will revert to the prior original behavior in the future.
1. For SCM Dashboards, the default view is the “list view ” for all gauges. Gauges appear initially in this view. You can easily change to the graph view by clicking the graph icon in the upper right.
2. Clicking the graph view on a gauge opens the gauge as a graph in a new tabbed window. To close the graph display of the chart, close the tab.
3. In SCM, when you configure new custom gauges, the Default View option is no longer available.
- Tabs: For SCM stand alone customers, tab view is the default, and only only view supported. The Use Tabs checkbox has been removed.
Problem Resolutions
• ERP: Payment Runs were creating duplicate AP transactions (and corresponding GL transactions) when users changed information on an included invoice that resulted in a Payment Method change. Similarly, changes to an AP location Address for a vendor on a payment run also resulted in duplicate transactions. This problem has been resolved.
The system does not allow changes to invoices that are assigned to a payment run, nor to the vendor AP location address information. The error occurred because this constraint was not being applied by the system, and now it is being applied. Users who attempt to change invoice information or AP address information (for invoices on incomplete payment runs) receive error messages, as follows:
Changes attempted for an invoice:
- “One or more Payment fields have been changed, but the invoice is selected on an Incomplete Payment Run. Changes are not permitted at this time. If possible, remove the invoice from the Payment Run and retry the changes.”
Changes attempted for an AP Location address:
-
“This AP location is associated with an invoice that is selected on an incomplete Payment Run. Address changes are not permitted at this time. Once the Payment Run is completed, the address change can be retried.”
What to do if you get this error message:
Since you can no longer change the AP Location address, or the invoice payment information, for an Incomplete Payment Run, you may:
- Remove the invoice from the payment run, then make changes to it.
- Cancel the payment run, and make the desired changes.
• ERP: SSO users could not sign in if their PremierConnect UserID contained an apostrophe (‘).
This problem has been resolved so that users with a special character in their UserIDs can sign in without difficulty. However, the system sign-on routines are more efficient if there are no special characters in UserIDs. (7.8.3.1)
• ERP: GL export jobs were occasionally failing, generating errors indicating a deadlock. Jobs can deadlock when multiple, simultaneous processes are running. The system “picks” a job to lock. In this case, the competing jobs were mostly EDI 856 transactions. This problem has been resolved so that GL exports now process with no locking, and better performance. (7.8.3.1)
• SCM: SCM indicated that there were pending price changes for item, but no price changes were displayed for review. This problem has been resolved so that price changes appear correctly on the Price Changes tab on the “Work with Contract” page, and the number of price changes listed is the same as on the Supply Contract Workbench. (7.8.3.1)
• ERP: EDI 810 invoice was not available for work.
Users reported that 810 imports were appearing in the 810 Imports list as "Complete " with the Status "Invoiced. "
However, the invoices were apparently not created.
This problem has been resolved so that EDI invoices are created from imports, as designed, and appear in the appropriate displays.
Note: If an 810 invoice matches an existing invoice's Org, Vendor No, Invoice No, Invoice Date, and Invoice Total,
the 810 invoice will be set to "Invoiced." No invoice is then created when the 810 is processed.
Otherwise, an invoice will be created, or the 810 will remain with a Status of "Exception – not Invoiced." (7.8.3.2)
• ERP: A problem was occurring when an invoice went back to the “last balancing approver” because the invoice was out of balance. Since that person had already approved the invoice, ERP could not create a new approval queue record. The process ended with the message “Can't create the record because it already exists,” but the invoice Status was still set to Pending Approval.
This problem has been resolved. The code now checks to determine if an approval queue record for the approver already exists. and if so, moves to the next approver. When the final approver attempts to approve the invoice, a message appears: "The Invoice is out-of-balance. You cannot APPROVE an Invoice that is out-of-balance." The invoice stays in the Pending Approval status until it is balanced by a user and can be approved. (7.9.0.1)
• ERP: Some users were getting a run-time error when trying to use "Move PO Lines" to move lines from one vendor to another.
This hotfix resolves the problem so that PO lines can be moved as normal. (7.9.0.3)
• ERP GL: Incorrect behavior when hovering over a dollar amount link in Financial Reports. Using a mouse-over on a dollar amount link in a financial report, then clicking the link took the user to a different panel. The panel looked like the Inquiry and Analysis panel. The descriptions for all of the account structure segments were not always visible. This problem has been resolved. The correct account descriptions are now displayed, instead of the incorrect panel.
ERP: Payment Runs were creating duplicate AP transactions (and corresponding GL transactions) when users changed information on an included invoice that resulted in a Payment Method change. Similarly, changes to an AP location Address for a vendor on a payment run also resulted in duplicate transactions.
For example, a payment run had the Check Output Type of “Custom Export.” All invoices on the payment run had a Payment Method of “Local Print.” The Paying Location on one invoice was changed and generated a change in the Payment Method from “Local Print” to “Credit Card.” The system then incorrectly created two “Pay Invoice – Credit Card” AP transactions with corresponding GL transactions for all invoices in the payment run.
This problem has been resolved.
The system does not allow changes to invoices that are assigned to a payment run, nor to the vendor AP location address information. The error occurred because this constraint was not being applied by the system, and now it is being applied. Users who attempt to change invoice information or AP address information (for invoices on incomplete payment runs) receive error messages, as follows:
Changes attempted for an invoice:
- “One or more Payment fields have been changed, but the invoice is selected on an Incomplete Payment Run. Changes are not permitted at this time. If possible, remove the invoice from the Payment Run and retry the changes.”
Changes attempted for an AP Location address:
- “This AP location is associated with an invoice that is selected on an incomplete Payment Run. Address changes are not permitted at this time. Once the Payment Run is completed, the address change can be retried.”
What to do if you get this error message:
Since you can no longer change the AP Location address, or the invoice payment information, for an Incomplete Payment Run, you may:
- Remove the invoice from the payment run, then make changes to it.
- Cancel the payment run, and make the desired changes. (7.9.0.5)
Appendix A – Using the PO Liability Maintenance Tool
This utility uses the standard ERP import process to bring in amounts for PO liability and tax liability (if relevant) for a specified organization and purchase order. The utility creates an AP transaction with the type "PO Liability and Tax Liability Write Off."
The amount in the transaction is: PO liability amount + tax liability amount.
Attachments to the AP transaction are the GL transactions for PO Liability, Tax Liability, and Write-Off GL accounts. Inter-org GL accounts will also exist when the organization for the write-off account is different from the organization for the PO.
Security: The role object "POLiabImport" controls the user's ability to work with this new tool. The default setting is None.
To use the new PO liability maintenance tool,
Make sure that the role object "POLiabImport" in your user role has the setting All or Create.
Step 1: Create the .csv file for the import
1. Create the upload file using an Excel spreadsheet. The first two rows are headers and upload information. The data columns begin on row 3.
| Row | Column | Contains | What is this? |
| 1 | A | POLiab | The name of the import type. ERP recognizes this name as a PO Liability and Tax Liability Write-Off file. |
| 1 | B | Customer ID | The name of your ERP site. If you do not know this this value, mouse over the Current Settings header above your current settings, or call the Help Desk. |
| 1 | C | Date | Use the format MM/DD/YYYY |
| 2 | A | Org | This is the column header for the organization field. |
| 2 | B | PONo | The column header for the purchase order number. |
| 2 | C | POLiabAmt | The column header for the PO liability amount from the PO. |
| 2 | D | TaxLiabAmt | The column header for the tax liability amount. |
| 2 | E | GLAcctWriteOff | The column header for the write- off account from your chart of accounts. |
| 3 and succeeding | A-E | data | Your data for each column: organization, PO number, PO liability amount, tax liability amount, GL write-off account. |
| Last row | Last column | EOF | This string must be the last element in the file. |
Figure 17 is an example of a spreadsheet for the import.

Sample Import Formatted as .xlsx
The upload file must be a .csv file.
2. Save the spreadsheet to a local network folder as a .csv file. The file name must be unique.
- Also, save the file as an .xls or .xlsx file, so that you can read it later if you need to.
Step 2: Upload the .csv file for import into ERP.
This step uses the standard ERP upload process.
1. From the Materials Management main Contents, select Imports, Exports and Financials > PO Liability Write Off Import. Or, from AP, select Imports / Exports > PO Liability Write Off Import.
A list of imports appears, if any have been created (Figure 18). Otherwise, No Data appears.
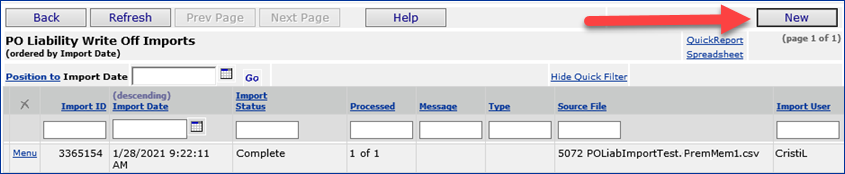
Sample List of PO Liability Write Off Imports
2. Click New. The import panel appears (Figure 19).
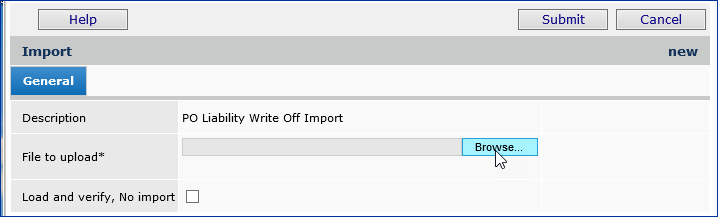
PO Liability Write Off Import Panel
3. Enter the file that you wish to import in the File to Upload field.
- Click Browse to locate the file.
- Click the file name to select it.
4. At this step, you have a choice. You can work through the import process in two stages or in one stage. For new users of this feature, we recommend the two-stage approach.
- To use the one-stage approach, click Submit. This approach loads and imports its data in one step.
- To use the two-stage approach, select Load and verify, No import. Then click Submit. This approach first loads the .csv file and validates it. You can correct errors, if needed, and upload the file again. You can then process it to import its data.
Step 3: Review the import
The following fields provide useful status data:
Import Status - The successful or unsuccessful status of the upload.
Complete: The .csv file uploaded and imported its data successfully.
Errors: The .csv file could not be read or validated.
Ready for Processing: If you have used a two-stage upload, the file is ready for the second (update) step.
Processed - The number of data records processed out of the total uploaded. This number indicates how many of the import file records successfully performed their respective actions on General Ledger account records.
n of X: X is the number of data records uploaded and n is the number of records processed.
For a one-stage upload, this field indicates whether the system could make changes to existing GL account information using the imported file's records, and, if so, how many records processed successfully. 0 of X means that the system was not able to process any of the imported file's records. For a two-stage upload, 0 of X is normal.
- Click Menu > View Import Details. The PO Liability Write-Off Import Details panel appears, and you can review your data.
- Click View Messages to display any error messages.
Additional Notes
- Once the "PO Liability and Tax Liability Write Off" transaction is created in GL transactions, the Invoice Match Status on the PO is updated to Matched. The audit panel contains the information that PO liability import has changed the Status.
- The Report Object “PO Liability Report Summary” and “PO Liability Report Detail “ include the "PO Liability and Tax Liability Write Off" transaction type.
Copyright © 2022 by Premier Inc. All rights reserved.