Requisition File and Non-File Items Version
Contents
| This topic discusses: |
Links
to related topics: |
|
For requesters and approvers:
For administrators:
|
For requesters and approvers:
For approvers:
For administrators:
For the warehouse:
|
| Search Online Doc |
|
Current Release Notes |
|
|
Overview
Supply Chain
gives you several ways to request supplies that you need. Usually,
the simplest method is to use an order guide. Order guides are shopping
lists of items commonly used in a department or other area.
If your department does not have an order guide, or if the item you need is
not listed on your order guide, you can request it directly by creating a requisition.
You should check
first to see if an order guide contains the item. If not, proceed with these
instructions.
If
you have not read Working With Requisitions,
you may wish to do so before you delve into the discussion below. Working With
Requisitions provides a broad picture of your options in requesting supplies
and defines several useful terms.
Financial Reporting Fields
Your site may be set up to use Financial Reporting Fields in various parts of the application. Similarly, you may also be using Project Codes and Fund Codes.
Financial Reporting Fields, along with Project Code and Fund Code let you generate reports on non-account code fields. For example, your site might define Physician as a financial reporting field. Users could then select the physician name associated with a regular, STAT, or bill-only requisition, for example.
If financial reporting fields are used by your site, the tab Fin Reporting appears on the panels. (Otherwise, this tab does not appear.) You can enter field values on the tabbed panel.
Details are in Using Financial Reporting Fields in ERP.
Security
To be able to requisition items from an Asset
Location, you need to have the proper authorization. Your system administrator can set up your user profile with the access to the appropriate data and permission for requisitioning. To create or edit blanket/standing requisitions, the appropriate setting(s) on the User Profile Authorities panel must be selected.
To access organization, department, or asset location data, the organization, department, or asset location must be included in a user's data profile.
- The "Requisitions" role object controls access to requisition creation, display, copying, and editing.
- For the Requisitions - All Depts list, the minimum setting is Create for users to create a requisition, copy a requisition, or submit a requisition for approval.
- For the Requisitions - Current Departments list, the minimum setting to copy a requisition is View.
- To edit a requisition, the setting must be Modify or higher.
- Release Req for Picking is controlled by the "Distribution" role object. The minimum setting to release a requisition is Create.
- Approvals are governed by the role object "Approval." The minimum setting to approve or reject a requisition is Modify. (A setting of View lets you review, but not approve a requisition.)
User Access to Requisition Documents
The "Documents" role object controls access to requisition documents. The setting Create (or All) allows users to create and copy documents. The default setting is Create. Only users with the setting All can delete documents.
File and Non-File Items
File
items are supplies that your site uses regularly in the normal course of operations.
All file items are listed in the Item Catalog. File items are classified as stock or non-stock. Depending on the hospital's supply chain structure, standard items in the item catalog may be kept on site at an asset location
and distributed to departments as requested. These items are stock items.
The item catalog also includes non-stock items, which must always be ordered from vendors when needed.
Hospitals that have a stockless supply chain environment may require all items to be ordered from vendors as needed.
Non-file
items are supplies, equipment, or services that are outside of your organization's
usual operational needs. Examples include special supplies for a funded project,
installation of new equipment, training, experimental work, and material for
facility repair. Non-file items are not listed in the item catalog.
The application can handle requests
for both file and non-file items on the same requisition, or on separate
requisitions.
Depending on the user settings
associated with your login ID, you may need approval for stock or non-stock
items, or for both. You may need approval for requests that exceed a particular
dollar value. Any requisition that needs approval will enter the approval process
automatically. If you are requesting an item that must be ordered from a vendor,
the approved requisition will trigger a purchase order, which is reviewed by
a buyer at your site.
The Life Cycle
of a Requisition explains what actions the system takes as a requisition moves
through different stages.
Internet Vendor Catalog Orders ("punchout") for Departments
The requisitioning feature lets users navigate to vendors' Internet sites and order supplies for their departments from within Supply Chain. Items ordered this way generate regular requisitions, which route for approval and create purchase orders. Both file and non-file items can be ordered. The vendor must be added as a punchout vendor by system staff. The hospital's system administrator must then register a vendor buy-from location as a punchout destination. Details on using this feature are in the topic Using Vendor Punchout to Order Departmental Supplies.
On the Requisitions list, the Punchout column (far right) contains "Yes" if the requisition was created using vendor punchout.
To create a regular
requisition:
The process
has two steps. First, you enter header information on the requisition. This
information includes your organization, department, the needed date, and so on. Then, you specify the items and the quantities that you need.
Enter Requisition Header Information
-
From
the Materials Management main Contents, click Requisitioning > Requisitions
- All Depts or Requisitions - Current Dept. The Quick Click panel
appears.
- Click New next to Create a New Entry.
The Create New Requisition panel appears (Figure 1).
You can get information about fields on the Requisition Header panel (or on
any panel) by clicking Help.
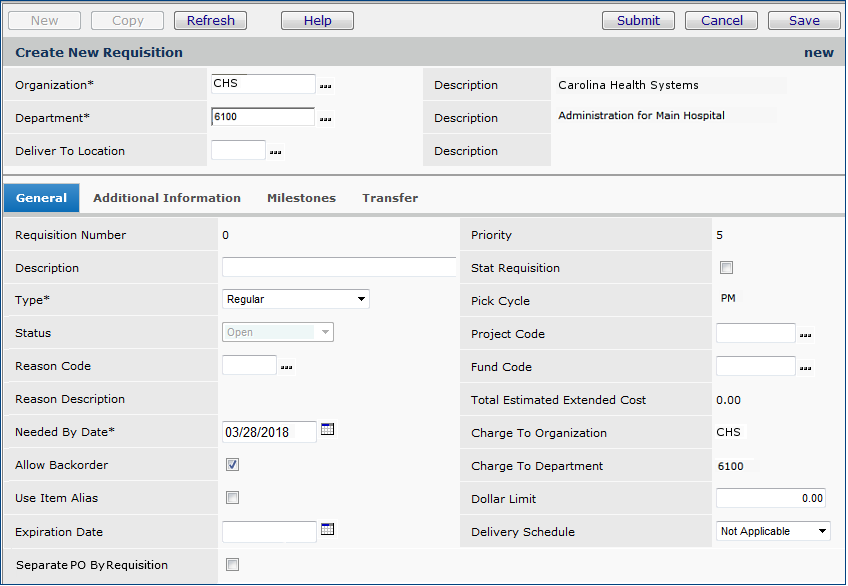
Figure 1 - Create
New Requisition: Enter Header Information
- Enter information on the panel. You must enter information in required fields
(marked with *).
- Notice that the requisition header contains the field Deliver to Location.
This field is a code for a delivery location for your department. You should
use this field when you expect the requisition to trigger a direct delivery
PO for a non-stock or non-file item. If relevant to your requisition, click
the prompt to select a location.
- Depending on your site's guidelines for STAT requisitions, you can select
the field Stat Requisition if you are requesting non-stock,
non-file, or direct delivery items. (Non-STAT item lines can also be included
on the requisition. See below.)
- The Priority field is set for the entire department on the department record.
- An entire requisition (and all its lines) can be designated as "separate." This feature allows separate POs at the requisition header level, and prevents lines from multiple requisitions to be combined on a purchase order. Also, for requisitions whose lines are all "Separate PO," it avoids having to select the field on each line. To designate the entire order guide requisition as "separate," select the field Separate PO by Requisition at the bottom of the Overrides panel (Figure 1).
- Complete fields as needed on the General and Additional Information
tabs.
(The Transfer tab is used
by warehouse and distribution staff for transfer requisitions. For normal
department requisitions, ignore it.)
-
Click
Submit.
The completed header form appears with a Requisition Lines section.
The Requisition Lines section contains "No Data."
Enter Requisition Item Information
-
On
the Requisition Lines part of the panel, click New. The
Requisition Line header and tabbed panels appear (Figure 2).
Figure 2 - Create a Requisition: Enter the Requested File Item
-
Fill in or change the values of
fields on the tabs.
File Items
- On the File Item Information tab, be sure to enter the
Item Number, Order Quantity, and Order UOM for the item you
are requesting.
- Select Direct Delivery if your department uses direct delivery,
and you expect the requisition to open a direct delivery purchase order.
- If you select Separate PO by Requisition (Figure 3, last line on the panel), when the requisition is approved and released, the application enters the line on a separate purchase order for the vendor. Click Help for detailed information on completing fields in the panel.
Note: If you are opening a direct delivery requisition,
the Order UOM must also be a purchase UOM defined in
the item record. The reason is that direct delivery requisitions generate
direct delivery purchase orders. If the Order UOM is not also
a purchase UOM, you get an error message when you submit the
direct delivery requisition. In this case, you have two options:
- Select a different UOM value in this field for the requisition.
- Go to the item record and change the Order UOM that you need
for the requisition so that it is also a purchase UOM.
See Separate POs by Requisition.
- Click the Overrides tab and enter information as needed.
- Select Shelf/Deliver to Location if you wish the direct delivery
item brought to a specify delivery location in your department. (You can
establish one or more delivery locations on your department's
record in the system. See Identify Administrative and Operational
Units.)
- Enter the Override Department code if the item you are ordering
should be charged to a department other than the usual department.
- If a Project Code is required, enter the Project Code. (See Using Project Codes with GL Accounts for details. Also, click Help and read the information for the Project Code field.)
- Click Save periodically while you are working so that
you don't lose the information that you entered. If you get an error message
for an invalid field entry, click the error message to see the field (highlighted
in pink) that is causing the problem.
- If the item is lot tracked, the application gives you the opportunity to enter
lot tracking information when you click Save. For requisitions,
this information is not required, however, depending on procedures at
your site, or if the information is useful to a vendor, you may wish to
enter lot tracking data. See Entering
Lot and Patient Information for an Item.
Non-File Items
- The Non File Item Information tab is for
requisitioning non-file items.
- To requisition
a non-file item, follow the procedure for requisitioning file items. Perform
all the steps in "Enter Requisition Header Information." Perform all
steps in "Enter Requisition Item Information" up to step 2. When you
get to step 2, use the Non File Information tab (Figure 3) on the Create
New Requisition panel.
- Select Direct Delivery if your department uses direct delivery, and you expect the requisition to open a direct delivery purchase order.
Note:
If your requisition contains duplicate lines, you will get a message
warning you, and asking you to verify that you want the duplicates.
-
Click Submit. Requisition header information appears.
- Click Refresh. The item you requisitioned
appears under Requisition Lines.
- To add more lines on the Requisition Lines panel,
click New. Repeat steps 2 through 5.
Note:
You can change setting of Allow Backorder. If you
uncheck the box, the system will not backorder the item
you request if the item is out of stock. In general, uncheck this field
when you cannot accept a backorder.
- When you are finished entering items, you submit the requisition for approval
or release. See To
submit a requisition for approval or release (below).
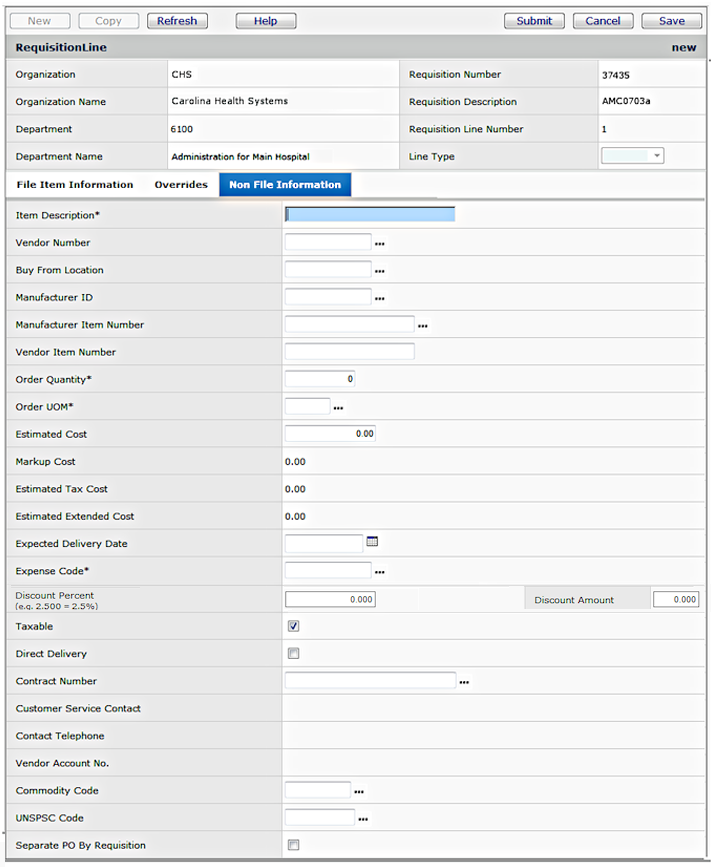
Figure 3 - Create a Requisition: Enter the Requested Non-File Item
Separate PO by Requisition
Separate PO by Requisition (Figure 3) for a non-file or direct delivery line: When the requisition is approved and released, the system enters the line on a separate purchase order for the vendor. Click Help for detailed information on completing fields in the panel.
Commodity Code and Project Code
Under some circumstances, you may need to enter a Commodity Code.
You may also need to go back to the requisition header's Additional Information tab to enter a Project Code.
Messages are displayed if entering either a commodity code or a project code (or both) is required.
(See Using Project Codes with GL Accounts for details. Also, click Help and read the information for the Commodity Code field.)
Tips on Completing
the Non-File Item Information Panel
- Enter an Item Description. If you know the vendor (or manufacturer)
of the item, and the vendor's (or manufacturer's) name for the item, enter
the item name.
- The Vendor Number is the application's code for a vendor. If you know
the vendor, click the prompt (...) to find and select the
Vendor Number. (If you cannot find it, it may not exist in the system.
In this case, leave the field blank.)
- The Manufacturer ID is the system code for an item manufacturer.
If you know the name of the manufacturer, click the prompt (...)
to see if the manufacturer name is listed in the system with an associated ID.
If the Manufacturer ID is listed, select it.
Note:
- If your non-file requisitions do not need approval, then the Manufacturer ID and Manufacturer Item Number fields are required.
- If requisitions that you create do require approval, you can leave these fields blank, and the approver/buyer will complete them.
- The item may have a Manufacturer Item Number - an ID or other
code on the item or packaging from the manufacturer. If so, click the prompt
to see if the Manufacturer Item Number is listed in the system, and
select it. (If not, just leave the field blank.)
- Similarly, the item may have a Vendor Item Number. If so, click
the prompt to see if it is listed, and select it. Otherwise, leave the field
blank.
- Enter the quantity of the item that you need in the Order Quantity
field.
- Click the prompt to select the unit of measure (UOM) associated
with the quantity that you are ordering.
- Enter your department's general ledger account code for the item expense
(Expense Code). Click the prompt to select from a list of accounts.
- For non-file lines, the Taxable flag is turned on by default if the organization record has Calculate Tax for Materials Transactions selected. See "To enter tax data for an organization" for details.
- Finally, complete other fields as relevant. For example, if the item is
governed by a contract, enter the Contract Number. If a commodity
code is assigned to the item, enter the Commodity Code.
- Click Save periodically while you are working so that you
don't lose the information that you entered. If you get an error message for
an invalid field entry, click the error message to see the field (highlighted
in pink) that is causing the problem.
When you have finished entering items, submit the requisition for approval
or release. See To
submit a requisition for approval or release (below).
STAT Requisitions
A requisition can be specified as STAT by selecting the Stat Requisition field on the requisition header. STAT requisitions
have one or more STAT item lines. STAT lines can only be created for non-stock,
non-file and direct delivery items. If you are working on a STAT requisition,
and wish to add a non-STAT line, when you create the line, on the Overrides panel, unselect the field Stat Requisition Line.
Note: If an existing PO has a non-STAT line, and an incoming, approved requisition
adds the same item to the PO, a second line, marked STAT is created. The PO
then contains two lines for the same item, and one of the lines is STAT. (The
entire PO is also marked STAT.) See STAT
Purchase Orders and Purchase Order Lines.
Depending on the user settings associated with your User ID, you may
need approval for non-file items. If approval is required, any requisition that
you enter with a non-file item line will enter the approval process.
Your
non-file item request will be reviewed and costed by staff in your Purchasing
organization (unless, of course, you are a buyer, and are creating the requisition
yourself). You will want to provide as much information as you can provide about
the item.
Requisition Approvals
Once you
have entered the items you need on a requisition, your next step will be to
submit the requisition for approval.
You may wish to review the documentation topic "Requisition Approval Processing by Cost, Commodity Code and Item Type" which explains the approval process and options for setting up requisition approvals in the application. A flowchart of the requisition approval process may also be helpful.
To
submit a requisition for approval or release:
From the Requisition panel, select either Finish
Now or Finish Later.
- Finish Now immediately submits your requisition
for approval. (If approval is not needed, the requisition is placed in a queue
to be released by the warehouse for allocation.)
- Click
Finish Now. The system asks if you want to submit the requisition for approval.
-
Click Submit. The system submits your requisition, and returns you to the
Requisitions list.
-
Click Refresh to see your requisition listed. .
- Finish Later lets you come back to your
requisition, and submit it for approval later.
-
When you click Finish Later, the system returns you to the Requisitions list.
-
Click Refresh to see your requisition listed, with a Status of
Open.
- Cancel deletes
the requisition that you just created. When you click Cancel, the system
prompts you to confirm that you wish to delete the requisition. Enter a Reason
Code and click Submit on the prompt panel to delete the requisition.
- Save saves your requisition.
The Life Cycle of a Requisition
Once you
click Finish Now, your requisition is entered into the application.
- If approval is needed, the requisition appears
on the list of the person (or persons) responsible for handling your requests.
The Status of the requisition is Pending Approval.
- If the requisition does not need approval,
its Status is Approved.
- If the requisition is rejected, its Status
changes to Rejected. You can change the requisition, and resubmit it
for approval.
Item lines on a single requisition may require
different approval paths depending on each item's type, cost, and whether the
item has an associated commodity code with a designated approver. For this reason,
when you submit a requisition, the system analyzes the requisition's lines to
determine how to route them for approval. For a discussion of the approval process,
see Requisition
Approval Processing by Cost, Commodity Code and Item Type. The
flowchart of the approval process may also be helpful.
If you
asked to be notified when your requisition is approved (or rejected), the application
will send you email.
- You can ask for notification on the Additional
Information tab in the Approval Notify Action field when you set up the requisition's header.
- Your administrator can also set the Approve
Notify Action field in your User Settings.
When a
requisition is approved, its Status is Approved, and you can release the requisition.
Clicking Menu > Release
Req for Picking releases the requisition.
After the requisition is released, the application does the following:
- For requisitions with stock items that have available quantity in the warehouse,
the requisition has the Status of Released and is ready for picking.
- A pick list is built for items that are available in the inventory
location. (Pick lists contain items that warehouse personnel collect from
the stock area at one time, usually on a schedule.) The warehouse personnel
then issue the available items and mark the picking activity as "confirmed."
- When the requisition is released, if a stock item is not available, the item is
put on a purchase order. If an open PO exists for the vendor, then the item becomes a line on that PO. Otherwise, ERP creates a new PO for the vendor for the item.
- For requisitions with only non-stock,
non-file or direct delivery items, purchase
orders are created for the items; or, if an open PO exists for the items, they are added to it. For this reason, non-file and direct delivery items
always have a link between the PO and the requisition. The requisition's Status
is Backordered.
- For requisitions with mixed stock, non-file,
and non-stock items, the requisition's Status is marked either Released or Backordered, depending on whether the stock items are available in inventory, and can be picked. Purchase orders for the non-stock, non-file, and direct delivery items are
created. The quantities backordered are recorded on the requisition. If a requisition has both items that can be picked and delivered, and items that need to be ordered from a vendor, the initial Status of the requisition will be Released. When the pick is confirmed, the Status changes to Backordered to provide notice that some items are still on order.
Note: If, for some reason, a buyer deletes a non-stock item from an unapproved
PO that the application generated, the system appends a system note to the original
requisition describing who deleted the item, and when.
When all items are issued, the Status of
the requisition changes to Complete.
Filling
a requisition for a stock item triggers other activities performed by
the application. The system reduces the on-hand quantity of the item in inventory, and,
if the quantity drops below certain levels, the application automatically issues purchase
orders for replenishing the stock. If enough of the item to fill a requisition
is not available, the application backorders the difference and places the item on
an unauthorized purchase order (See Suggested Order
List.)
Purchase
orders generated by requisitions have a life cycle of their own that involves
price confirmation, authorization, transmission to vendors, receipt, and issuing
to the department requesting items. See Working
With Purchase Orders for more information.
You
can view the progress of a requisition from the time you open it to the complete
issuing of items. See View
department requisitions.
Approval History
The Approval History panel displays information about the approval routing and approval status for your requisition. You can identify approvers, and if several, note which approver currently has your requisition in his/her queue. You can also see the length of time that each approver has/had the requisition and other information.
The topic Approval Information on Inquiry Panels: Examples contains some sample Approval History panels.
To view a requisition's
approval history:
- From the Materials Management main Contents, select Requisitioning > Requisitions
- Current Department or Requisitions - All Depts.
The Quick Click menu appears.
- On the Quick Click menu under "I would like to..." select
"Inquiry."
- Enter a Requisition Number and click Go.
The Requisition Inquiry panel appears.
- Select the Approval History tab.
To
add more items to a requisition:
Once you have created a requisition, you can add items to it, as long as the
requisition is in Open status (has not been approved).
-
Click
New on the Requisition Lines list.
-
See
"Enter Item Information"
above.
Note: If your requisition contains duplicate lines, you will get a message warning
you, and asking you to verify that you want the duplicates.
To
submit a "Finish Later" requisition:
-
From
the Materials Management main Contents, select Requisitioning > Requisitions
- All Depts or Requisitions - Current Dept. The Quick Click menu
appears.
-
Select
Submit for Approval under I would like to....
-
Enter
the Requisition Number in the field under Requisition Number, and
click Go.
-
You are
asked if you want to submit the requisition for approval. Click Submit.
Your requisition is submitted.
You
will see a change in the Status field for the requisition.
- If the requisition needs
approval, the Status changes from Open to Pending Approval.
When the requisition is approved, the Status changes to Approved.
- If the requisition does
not need approval, the Status changes from Open to Approved.
To
cancel a backorder:
For
stock items, if the quantity of an item that you need is not available, a backorder
for the item is created by the application . Similarly, for non-stock and non-file items,
since there is no inventory of these items, a backorder is also created.
You
may decide that you do not want an item that has been backordered, perhaps to
substitute a different item, or because your needs have changed. In this case,
you can cancel the backorder.
-
From the Materials Management main Contents, select Requisitioning
> Departments. The Quick Click menu appears.
-
Select Backorders To Department from the choices under I
would like to...
-
Enter your department number in the field under Ordered by... Department
and click Go. Your department's backorders appear.
-
Locate the backorder that you wish to cancel.
-
Next to the backorder, click Menu > Cancel Backorder. A message
appears asking you to verify that you want to cancel the backorder.
-
Click Submit. The backorders list reappears, and your
canceled backorder -- with the corresponding requisition or requisition
line -- is gone.
Canceling Backorders for Unreceived Quantities of Items
Under some circumstances, you may need to receive part of an item on a purchase
order, and cancel the unreceived quantity of the item. The application provides ways
to cancel the unreceived portion of stock or non-stock items on a purchase order
so that you can complete the purchase order. The canceled quantity is maintained
in the purchase order record.
How to cancel unreceived quantities of items is discussed in Canceling
Unreceived Quantities of Items.
Using Notifications for Requisition Lines Not Written To a Purchase Order
Normally, non-stock, non-file, and direct delivery items on approved requisitions are written directly to purchase orders. On occasion, the system cannot write one or more requisition lines to a PO, for various reasons; for example, if a file item on the requisition is inadvertently made “inactive.” In these cases, the line is dropped. A similar situation occurs when a buyer reviewing the purchase order deletes one or more lines written to the PO from the requisition. The requester needs to be notified about these events.
In both cases, the requisition appears to be complete, but in fact, lines are missing from the PO. To notify the requester, a flag on the User Profile can be set to alert the person that a line was not written to the PO, or the line was written to the PO, but deleted. Another User Profile field also can be set to notify the buyer that a line was deleted.
- For the requester, the field is Requisition Line Dropped Notify Type on the User Profile Requesters Limit panel. This field allows a user making requisitions to select if he/she would like to be notified if a requisition line ordered quantity was dropped from the associated PO, or deleted from the PO. If the user wishes to be notified, an email message appears.
- For a buyer, the field is Requisition Line Deleted Notify Type on the User Profile Buyer Limits panel.
Setting the Notification Flags for the Buyer and Requester
For the requester, the field to set is Requisition Line Dropped Notify Type on the User Profile Requester Limits tab. For the buyer, the field Requisition Line Deleted Notify Type on the Buyer Limits tab notifies requesters of deleted lines.
To set the requester field,
- From the Work in Administration main Contents, click Administration > Users. The list of users appears.
- Locate the User ID for the person who needs the flag set (or unset).
- Click the edit icon
 next to the User ID to edit the User Profile.
- Click the Requester Limits tab. The panel appears (Figure 4).
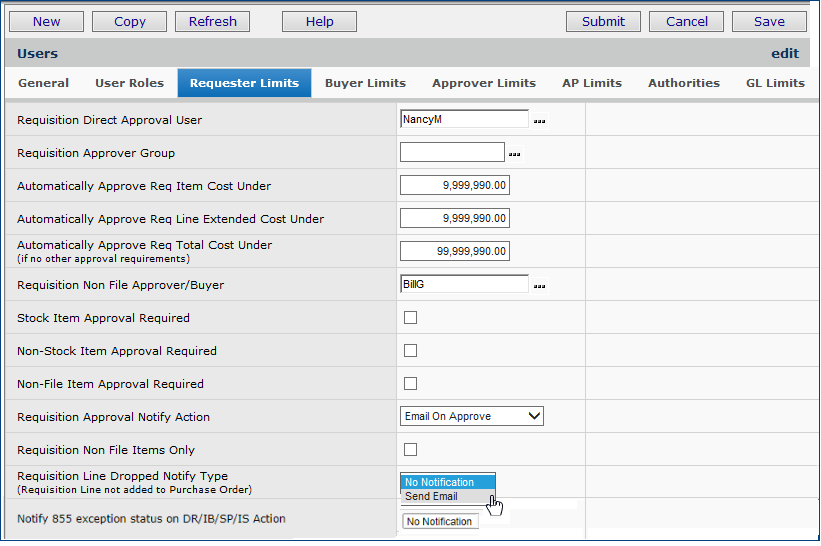
Figure 4 - The User Profile Requester Limits Tabbed Panel with the Requisition Line Drop Flag
- Set the Requisition Line Ordered Qty Dropped Notify Type as desired. Values are:
No Notification - No email is sent when requisition lines are dropped from a PO.
Send Email - An email message is sent to the user if one or more requisition lines are not written to a PO. The email message identifies the requisition number and description, the user making the request, the item number(s), the quantity requested, the quantity killed, and the reason the lines were dropped from the PO.
Figure 5 is an example of a message for a non-stock item dropped from a PO because the item catalog record was set to Inactive:
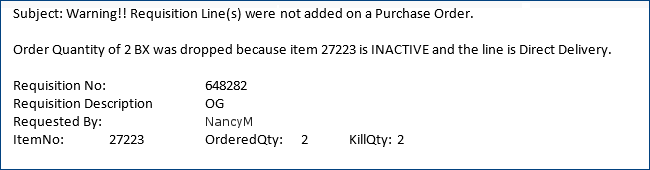
Figure 5 - Email Message for a Non-Stock Line on a Requisition Dropped from a PO
Figure 6 is an example of a message for a non-file item whose vendor has been deleted.
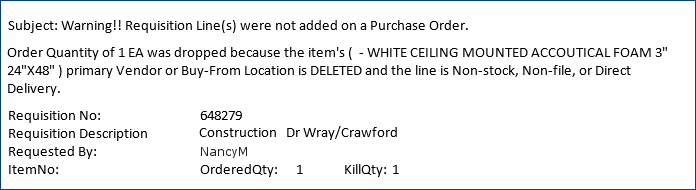
Figure 6 - Email Message for a Non-File Line on a Requisition Dropped from a PO
Figure 7 is an example message that contains two dropped requisition lines.
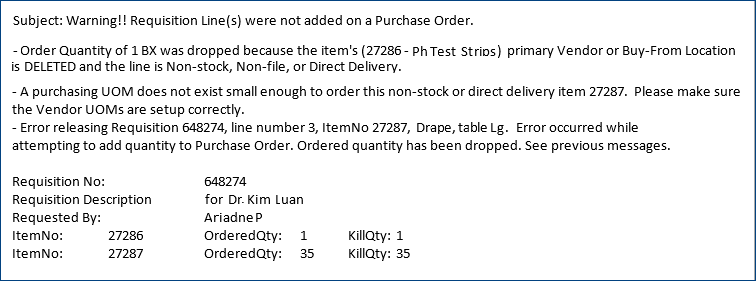
Figure 7 - Email Message for Non-Stock and Direct Delivery Lines Dropped from POs
To set the buyer field
- Follow steps 1 through 3 for setting the requester field.
- Instead of clicking the Requester Limits tab, click the Buyer Limits tab. The panel appears (Figure 8).
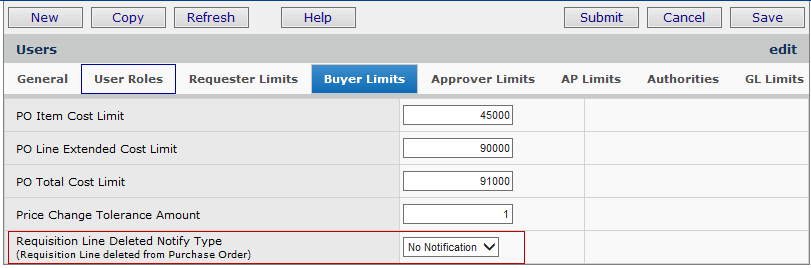
Figure 8 - The User Profile Buyer Limits Tabbed Panel with the PO Line Deleted Flag
- Set the Requisition Line Deleted Notify Type as desired. Values are:
No Notification - No email is sent when requisition lines are dropped from a PO.
Send Email - An email message is sent if one or more requisition lines are deleted from a PO.
The resulting email messages will inform users of the requisition number, what PO the item line was deleted from, the item, the item description, the vendor number, the buy-from location, and the manufacturer name, and the manufacturer item number.
Filtering Lists for Requisitions with Dropped or Deleted Lines
You can filter several requisition lists to display only requisitions that have at least one line dropped from their associated purchase orders. On these lists of requisitions, viewing audit information (Menu > View Audit Info) provides more information about dropped lines.
This feature lets a buyer or a requester identify any requisition containing lines dropped or deleted from a PO. The audit details let the user research each dropped line and take corrective action to ensure each line is filled.
For example, Figure 9 displays the list of Requisitions by Supplying Asset Location filtered for those requisitions with deleted/dropped lines. The column Lines Deleted from PO is set to Yes.
Here is the path to this list: Materials Management > Warehousing > Requisitions by Supplying Asset Location.
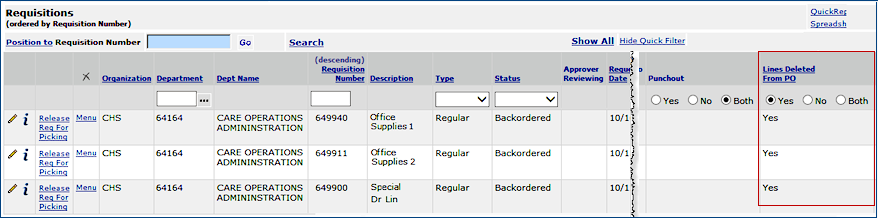
Figure 9 - Requisitions by Supplying Asset Location Filtered for Dropped Lines
This filter column also appears on these lists of requisitions.
- Requisitions for the current department - Materials Management > Requisitioning > Requisitions - Current Dept.
- Requisitions for all departments - Materials Management > Requisitioning > Requisitions - All Depts.
- Departmental requisitions - Materials Management > Departments > Menu > Requisitions.
- Requisitions by supplying asset location (displayed in Figure X) - Materials Management > Warehousing >Requisitions By Supplying Org/Asset Location.
- Finally, from the list of backorders for a department, you can display any backordered requisition.
- The path is: Materials Management > Requisitioning > Departments > Quick Click: Backorders to Department > Menu > Requisition.
When Lines Deleted from PO is Yes, clicking Menu > View Audit Info provides details on the dropped line(s).
To
create requisition standard notes:
You
can create standard notes that the application can add to any requisition that you
wish.
-
From
the Materials Management main Contents, select Requisitions > Requisition
Standard Notes. The Requisition Standard Notes list appears. The list
shows the first line of each note.
-
To
create a new requisition standard note, click New. The Requisition Standard Notes panel is displayed.
- Enter the note in
the text box on the panel. You can type as many lines in the note as you
wish. The text box will give you more space and will scroll.
- Click Submit when
you are finished. The Requisition Standard Notes list reappears.
- Click Refresh
to see your new note.
-
To
view a requisition standard note, select
Menu > Edit. Click Cancel when you are finished reading
the note.
- To edit an existing
requisition standard note, select
Menu > Edit. A text box appears with the note displayed.
- Type the changes
in the text box.
- Click Submit
when you are finished.
The Requisition Standard
Notes list reappears.
To
copy a Requisition Standard Note to a requisition header:
-
From
the Materials Management main Contents, select Requisitioning >
Requisitions - Current Dept (or Requisitions - All Depts).
The Quick Click menu appears.
-
Under
I would like to..., select Copy Req Standard Notes.
-
Under
Requisition Number, enter the requisition number, and click Go.
The Copy Requisition Standard Notes panel is displayed. The requisition
header information is on top and the list of requisition standard notes
available is at the bottom.
-
Click
one or more boxes in the Select column for the notes that you wish
to copy to the requisition.
-
When
you are finished selecting notes, click Submit. The system returns
you to the Quick Click menu.
- To view the requisition
standard notes that you just assigned to your requisition header,
- From the Requisitions
Quick Click menu, under I would like to..., select View the Requisitions
List.
- Select Requisition
Number under Ordered by... Requisition Number.
- Enter your requisition
number in the box under Starting with...
- Click Go.
Your requisition appears
at the top of the list with a yellow "sticky note" icon. Click
the icon to see the notes.
To
copy a Requisition Standard Note to a requisition line:
-
From
the Materials Management main Contents, select Requisitioning >
Requisitions - Current Dept (or Requisitions - All Depts).
The Quick Click menu appears.
-
Under
I would like to..., select Edit.
-
Under
Requisition Number..., enter the requisition number in the box next
to Requisition Number and click Go. The requisition appears.
-
Next
to the requisition line you are interested in, select Menu > Copy
Req Standard Notes.
The Requisition Standard Notes panel is displayed.
-
Click
one or more boxes in the Select column for the note(s) that you
wish to copy to the requisition line.
-
When
you are finished selecting notes, click Submit. The system returns
you to the Requisition Lines panel.
- Click Refresh.
A yellow note pad icon appears next to the requisition line. You can click
on the note pad to view the note.
Bill-Only Requisitions
Bill-only requisitions are used for items that are not procured through the usual process. For example, a device may be provided by a manufacturer whose representative brings the item to the hospital and works with the surgeons who implant it. The item is consumed, and must be paid for. "Bill-only" requisitions and POs are designed to accommodate this situation. Bill-only requisitions go through normal approval processes set up for the hospital, then flow to bill-only POs, and to vendors. The vendors send invoices for payment.
See the online chapter Using "Bill Only" Requisitions and Purchase Orders for details.
Direct
Delivery Requisitions
Direct
Delivery Requisitions specify that the items requested must be delivered from
a vendor directly to the department. When you create a direct delivery requisition,
the requisition quantity (either in the lowest UOM or not) and the ordered UOM
are transferred to a Direct Delivery Purchase order as is. No best purchase
packaging process occurs for the PO line. The application accepts the quantity
and UOM at face value. For example, if the you order 15 EA and 15 EA = 1 BX,
the ordered quantity and the UOM will be 15 EA.
If a vendor ships
more than requested on a direct delivery PO, the system displays a message that
an overage exists. If the user's organization allows over-receiving, and the user accepts the overage, the system creates a new completed
requisition for the overage, and the direct delivery department will be issued
all items received. On the Requisitions list, the requisition will carry the
tag: Created For Overage Receipt #[receipt number].
Intra-
and Inter-Organization
Requisitions
The application supports both simple and complex supply structure configurations for
a site. For example:
- If your site keeps item
inventories in several asset locations, an asset location can be assigned
to each hospital department. This asset location is the department's Default
Asset Location, normally responsible for handling the department's
needs.
- You may have a large
central storage area that supplies smaller asset locations which then distribute
items to departments. In this situation, the smaller supplied
asset locations receive materials from the large supplying
asset location. If you have a cross-organizational supply process, the asset
locations can belong to different organizations.
- You may occasionally
transfer supplies between asset locations to meet particular needs. You can
make transfers between asset locations in the same organization (intra-organizational)
or in different organizations (inter-organizational).
Your supply structure is
relevant to requisitioning. When you create or edit a requisition, at the
line item level , the system allows you to designate a supply asset location
that is different from the default asset location. If you are set up for cross-organizational
processing, the designated asset location can be in the same organization, or
in a different one, as long as the requested item is in the inventory of the
asset location.
To specify a different asset
location or a different organization, use the Supply Organization and
the Supply Asset Location fields on the Requisition Line Edit panel.
Select the organization and/or the asset location from the prompt in each field.
See the Help documentation for the Item Information panel for details
about the Supply Organization and the Supply Asset Location. Remember
that both organizations must be set up for cross-organizational processing.
See Processing Items Across Organizations.
Transfer
Requisitions
If
your supply structure contains multiple storage locations, you may need to transfer items between asset
locations -- either in the same organization, or in different organizations.
Supply Chain handles this need through transfer requisitions. Transfer
requisitions can be used to track item moves through the various
distribution and accounting steps.
- A supplied asset
location uses an Inventory Transfer requisition to request
items from its supplying asset locations.
- A supplied asset
location uses a Credit Inventory Transfer requisition to return
items to its supplying asset location.
- Both the department receiving
the items and the department supplying the items must be asset
locations.
Transferring Supplies Among
Asset Locations contains instructions for setting up organizations and asset locations for item transfers. A detailed walkthrough of the process used to create, release, receive, and pick Inventory Transfer Requisitions is in the section: Create a Manual Inventory Requisition.
In summary, use
the normal procedure
to create transfer requisitions, with these differences:
- In the Current Settings box, make sure that the Department field for the department creating the requisition identifies an asset location.
- The Asset Location field should also contain the code for the asset location originating the requisition
- Any item being sent or
returned must exist in both asset location inventories.
- On the New Requisition
General tab, select the transfer type in the requisition Type field.
- Inventory Transfer transfers items between asset locations.
- Credit Inventory Transfer reverses an Inventory Transfer. It gives credit to an asset location to which items were transferred, and then transferred back.
- Department Transfers are handled with the Quick Credit function under the Warehousing menu. The application automatically creates the requisition of this type to match a department-to-department credit whenever a Quick Credit is created.
- For a Credit Inventory Transfer requisition, the item must have available quantity in the asset location that
is returning the item.
- On the Transfer
tab (Figure 10), enter the department in the Transfer From/Return To Dept
field:
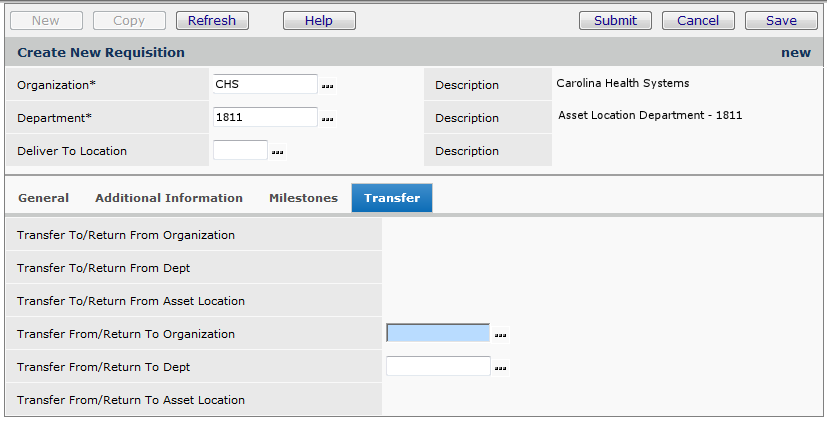
Figure 10 - Transfer Tab for a Transfer Requisition
-
If you are opening an Inventory Transfer requisition to send items to
a supplied asset location, enter a value in the Transfer To/Return From Asset
Location field.
-
If you are opening a Credit Transfer Inventory requisition to send items
back to a supplying asset location, enter a value in the Transfer From/Return
To Asset Location field.
Using Standing and Blanket Requisitions
Blanket and standing requisitions create blanket and standing purchase orders, respectively. Once the purchase order is created, it functions as a normal blanket/standing PO.
A blanket purchase order is an "ongoing" PO that often contains no
specific quantities and no ship dates. Instead, a blanket purchase order is
issued for a defined time period, or for a particular dollar amount.
A standing purchase order sets up regular intervals for the delivery of items in specific
quantities over a period of time.
Security for Blanket/Standing Requisitions
To create or edit blanket/standing requisitions, the appropriate setting(s) on the User Profile Authorities panel must be selected. The fields are:
Allow Add/Update of Blanket Requisitions and Allow Add/Update of Standing Requisitions. See Setting User Authorities.
If a user's authorizations are not set, the Blanket and/or Standing option will not be available from the Type field when the user creates a requisition. Also, if an unauthorized user attempts to edit a requisition, clicking the Menu > Edit option or the edit icon for the requisition will generate the error message: "Insufficient Authority. Your current User Settings do not allow editing of Blanked/Standing requisitions."
Note: Blanket requisitions (and blanket POs) cannot be STAT.
General rules:
- Only non-stock and non-file items can be entered on a blanket or standing requisition. If you key in a stock item number, the field turns pink and a message appears. Blank out the field and select a non-stock or non-file item from the prompt.
- The first line entered on a blanket or standing requisitions determines the supplying organization, supplying asset location, vendor and buy-from location for subsequent lines.
- Clicking the Item Number prompt opens a list of items for primary vendors only. Fill/kill vendor buy-from locations are not included.
- Only items from vendor buy-from locations authorized for the user are displayed for selection. These vendor buy-from locations may be restricted by organization.
- You cannot use warehouse export/import processing with blanket or standing requisitions.
- Requisition imports do not create blanket or standing requisitions.
- On blanket requisitions you can enter zero-quantity lines, but the lines must be for non-file items. If the first line that you enter is a zero-quantity line, any other lines must also be non-file, zero-quantity lines. If the first line has a quantity specified, all other lines must also have a quantity.
- Approval processing, if set up for your organizations, applies to both standing and blanket requisitions. (Exception: blanket requisitions with zero quantity, zero cost, receiptless non-file lines do not have to be approved by a costing buyer.)
- You can assign invoice approvers to blanket requisitions, for later approval routing of EDI 810 invoices associated with the blanket requisition and PO. When you specify Requisition Type Blanket, an approval tab appears for you to enter invoice approvers. Otherwise, you can use automatic approvals for EDI 810 invoices, including invoices for blanket POs. Approvers that you designate on a blanket requisition propagate to the associated purchase order and invoice.
Zero-Quantity Blanket Requisitions
Blanket requisition lines with zero cost, zero quantity are defaulted by the application with Receipts Required turned off. If you turn this field on, the system will reset it to off for these lines.
Approvals for Zero Quantity Blanket Requisitions
When a blanket requisition line has a missing Est Unit Cost and Est Extended Cost, neither field can be used to determine whether approval is needed. Instead, the following steps apply:
- The requisition's Dollar Limit is used to determine whether the requisition line needs approval. (Of course, when the Est Unit Cost and/or Est Extended Cost are present, they are used.)
- To identify the next approver in an approver group who should review the requisition, the requisition's Dollar Limit is used instead of the requisition Total Estimated Extended Cost.
- Once the approver whose maximum limit is greater than the blanket requisition's Dollar Limit has approved, approvals are completed.
Report Fields
For blanket and standing requisition reports, several fields are available in these requisition report objects: "Requisition Headers," "Requisition Details," and "Requisition Details – Warnings and Errors." The fields are: ExpirationDate, DollarLimit, and DeliverySchedule.
Create a Blanket Requisition
- From
the Materials Management main Contents, click Requisitioning > Requisitions
- All Depts or Requisitions - Current Dept. The Quick Click panel
appears.
- Click New next to Create a New Entry.
The Create New Requisition panel appears.
- Select a Deliver to Location, if needed, and enter a Description for the requisition.
- In the Type field, click the down arrow and select Blanket (Figure 11).
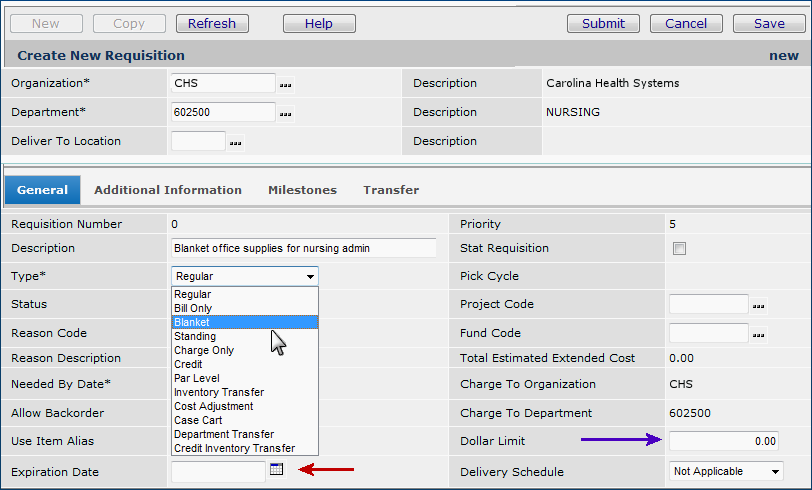
Figure 11 - Creating a Blanket Requisition
- Enter an Expiration Date (Figure 11, red arrow) and a Dollar Limit (Figure 11, purple arrow). Both fields are required.
Enter other fields as needed.
Note: You cannot select a value for the Delivery Schedule: this field is for standing requisitions only.
- Click Submit.
The completed header form appears with a Requisition Lines section.
The Requisition Lines section contains "No Data."
- Enter requisition lines.
Only non-stock items are available for selection. You can also enter non-file lines.
See the General Rules for types of lines allowed.
Instructions for entering requisition lines are in the online documentation topic "Enter Requisition Item Information."
- When you have finished entering lines, click Finish Now to process the requisition.
If your organization uses approval processing,
the requisition routes for approvals.
Create a Standing Requisition
- From
the Materials Management main Contents, click Requisitioning > Requisitions
- All Depts or Requisitions - Current Dept. The Quick Click panel
appears.
- Click New next to Create a New Entry.
The Create New Requisition panel appears.
- Select a Deliver to Location, if needed, and enter a Description for the requisition.
- In the Type field, click the down arrow and select Standing (Figure 12).
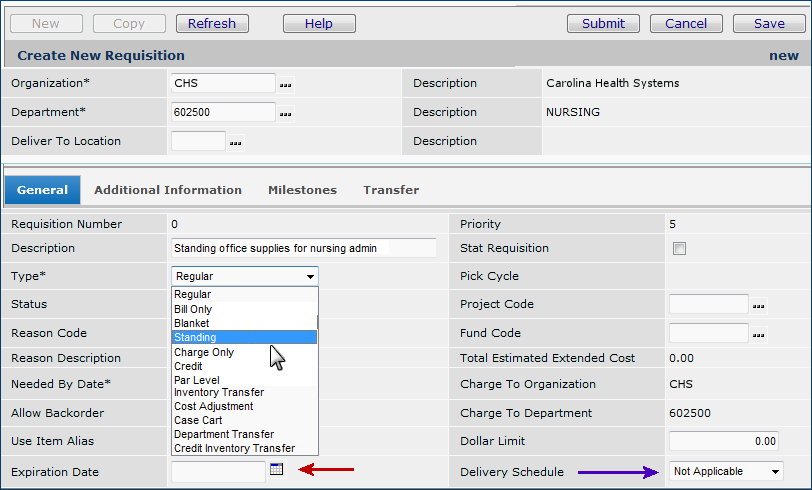
Figure 12 - Creating a Standing Requisition
- Enter an Expiration Date (Figure 12, red arrow). Click the down arrow next to Delivery Schedule (Figure 12, blue arrow) and select an option. Both fields are required.
Enter other fields as needed.
Note: You cannot enter a Dollar Limit: this field is for blanket requisitions only.
- Click Submit.
The completed header form appears with a Requisition Lines section.
The Requisition Lines section contains "No Data."
- Enter requisition lines.
Only non-stock are available for selection.
You can also enter non-file lines. See the General Rules for types of lines allowed.
Instructions for entering requisition lines are in the online documentation topic "Enter Requisition Item Information."
- When you have finished entering lines, click Finish Now.
If your organization uses approval processing,
the requisition routes for approvals.
The standing requisition generates a standing purchase order.
Blanket and Standing Requisition Processing
A blanket requisition generates a blanket purchase order. A standing requisition produces a standing purchase order.
Non-stock lines do not allocate on-hand quantity, if any exists. Both non-stock and non-file requisition lines go directly to a purchase order. (You can send file and non-file items to separate purchase orders, also, if you wish. See the previous discussion.)
When a blanket requisition is submitted for approval and released, the system looks for an existing, unedited blanket PO with the same vendor and buy-from location. If an existing PO is found, the Dollar Limit on the PO will be increased by the Dollar Limit amount on the blanket requisition being added. Also, the Expiration Dates are compared. If the blanket requisition has an Expiration Date later than the PO's Expiration Date, the PO's Expiration Date is changed to the requisition's Expiration Date. Identical items are combined on PO lines. If a PO line does not exist for a requisition item, then a new line is added. If no PO exists for the vendor buy-from location, a new PO is generated for the blanket requisition.
Similarly, when a standing requisition is submitted for approval, the system looks for an existing, unedited standing PO with the same vendor and buy-from location and the same delivery schedule as on the requisition. If an existing PO is found, the Expiration Dates are compared. If the standing requisition's Expiration Date is later than the PO's Expiration Date, the PO's Expiration Date is changed to the requisition's Expiration Date. Identical items are combined on PO lines. If a PO line does not exist for a requisition item, then a new line is added. If no PO exists for the vendor buy-from location and the delivery schedule, a new PO is generated for the standing requisition.
A purchase order generated from a blanket or standing requisition can be edited and have lines added. Any line added will create a new regular requisition. Updating of any line created from a blanket or standing requisition will update the associated requisition line, with the exception of zero quantity lines as these requisitions are be completed after the PO is created.
When zero-quantity lines are placed on a blanket purchase order, the matching zero quantity requisition lines are deleted and the requisition is completed. During blanket purchase order processing, requisitions for zero quantity items are created at invoicing for receiptless lines, and when a receipt is generated for lines requiring receipts. A system note is added to the original blanket requisition. The system note includes the Purchase Order Number contains the items.
Blanket requisitions with zero quantity, zero cost, receiptless non-file lines do not enter the approval process. Requisition splitting will still occur, based on approval requirements. Therefore, several blanket or standing purchase orders can result from one blanket or standing requisition.
Separate Purchase Orders for File and Non-File Items
Normally, non-file and file items on a requisition are both written to the generated purchase order. If you wish, you can direct the system to generate separate purchase orders for file and non-file items from the same requisition.
- To generate separate purchase orders, select the field Separate PO by Requisition when you create the requisition line. See Figure 13, for non-file items, and Figure 14 for file items.
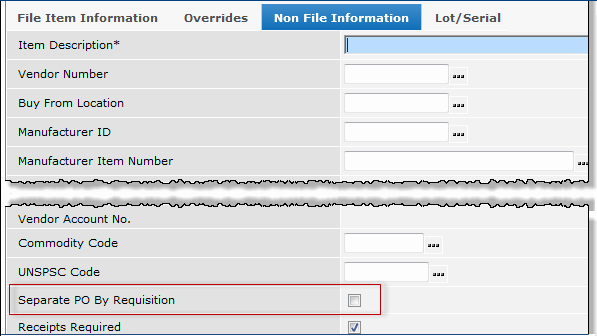
Figure 13 - Creating a Requisition Non-File Line to Generate a Separate PO
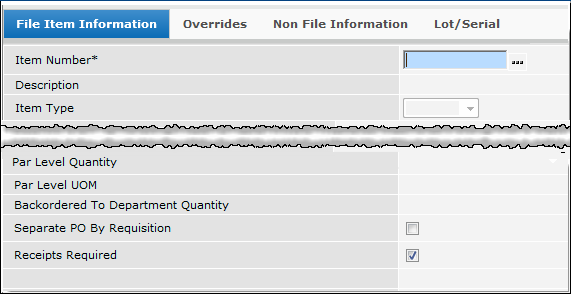
Figure 14 - Creating a Requisition File Line to Generate a Separate PO
Delete One or More Requisitions
You can use Quick Delete with the Requisitions list to delete one, or many Open requisitions. Lists with Quick Delete have a small X at the top of the Menu column (Figure 15). The "Reason for Delete" window no longer appears.
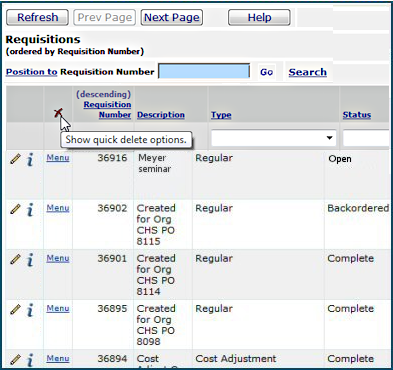
Figure 15 - Quick Delete on the Requisitions List
- Click the X to open the
Quick Delete box (Figure 16).
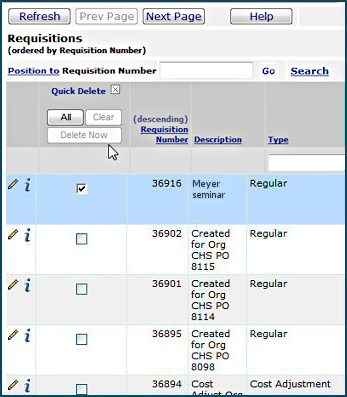
Figure 16 - Opening Quick Delete
- Click the box for any row to select the row for deletion.
- Click All to select all rows (...if all rows have Open requisitions).
- Click Clear to clear all selections.
- After you select a row or rows, click Delete [number] Now to delete the row(s).
(Number is the number of rows.) If you have selected All, [number] is the total rows to
be deleted.
Deleting Approved Requisitions
Quick Delete applies to Open requisitions. However, you can delete an Approved requisition if:
- The approved requisition is for stock items, and is not backordered.
- The approved requisition has not been released.
In other words, a requisition that is approved which has generated no purchase order line (or changes to a PO line), and which has not been issued to the requester can be deleted.
Note: Quick Delete applies
to one page at a time. If you have a multiple-page list, you need to scroll
forward (Next Page) and use Quick Delete on each subsequent
page.
Documents for Requisitions
Documents can be added, viewed, and deleted when editing or inquiring on a requisition.
Documents Containing Electronic Protected Health Information (ePHI)
If you do not have ePHI access, and the "Contains ePHI Data" checkbox is selected, you cannot view a document. When you click the arrow to open the document, the Insufficient Authority message appears. For more information, see Securing Electronic Protected Health Information (ePHI).
For Bill Only documents, if the checkbox has previously been selected for "Contains ePHI Data," then only the Administrator can change the status of the document and select or unselect the "Contains ePHI Data," checkbox. This checkbox remains locked for everyone else.
To view and work with a requisition's documents:
- On the Requisitions list, locate the requisition of interest.
- Next to the requisition, click i for inquiry (or, if the check request is available for editing, click the pen icon ).
- Click the Documents tab. The Requisition Documents panel appears (Figure 17).
A list of documents attached to the requisition is displayed, if any exist.
To view a document,
- Click the arrow next to the document.
The Microsoft Windows Download panel appears.
-
Click Open.
- You can attach a new document to a requisition by clicking New (Figure 17, red box).
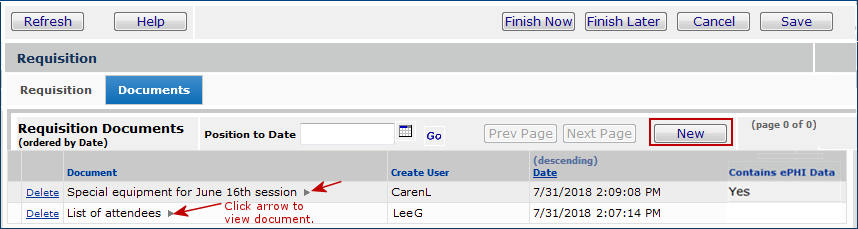
Figure 17 - The Documents Panel for Requisitions (on the Requisition Edit)
To add a document to a requisition:
- Click the Documents tab when editing or inquiring on the requisition.
- Click New (Figure 17, red box).
The Requisition Document Create panel appears (Figure 18).
- Enter a name in the Document Name field.
The name will be displayed on the Requisition Documents panel when the document is uploaded.
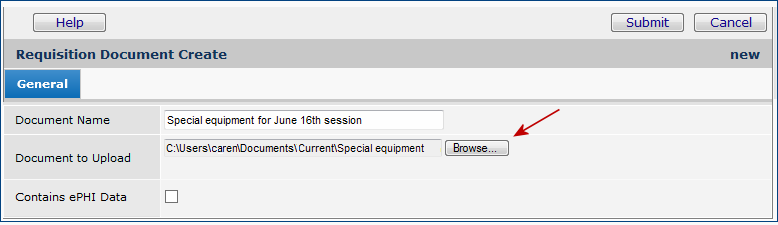
Figure 18 - Adding a Document to a Requisition
- Click Browse.
The Microsoft Windows Choose File panel appears.
- Locate and select the file for the document that you wish to upload and add.
When you select the file, Windows populates the File name: field on the Choose File panel.
- Click Open (on the bottom right of the Windows Choose File panel).
The document path and file name appear in the Document to Upload field on the Requisition Document Create panel.
- Click Submit.
A message tells you that the document is uploaded.
- Click the back button or close the tab to close the message.
- Click Refresh.
The document appears on the Requisition Documents panel (Figure 17).
To delete a document attached to a requisition:
- Click Delete next to the document.
The system asks you to confirm the deletion.
- Click Delete.
Note:
When a document has been copied from a requisition or requisition line to a PO, Delete removes all references to the document being deleted.
Uploading Quotes to Automatically Generate Requisitions
This is a future feature.
Copyright © 2023 by Premier Inc. All rights reserved.
requsition requistion reqisition requstion